
Classic Canadian Butter Tarts: A Sweet Maple-Filled Recipe
Sweet memories of grandma’s kitchen come flooding back with these classic butter tarts that capture the heart of canadian culinary tradition.
Maple-scented memories dance through generations of home cooks who cherish this beloved dessert.
Rustic and simple, these tarts tell a story of comfort and warmth.
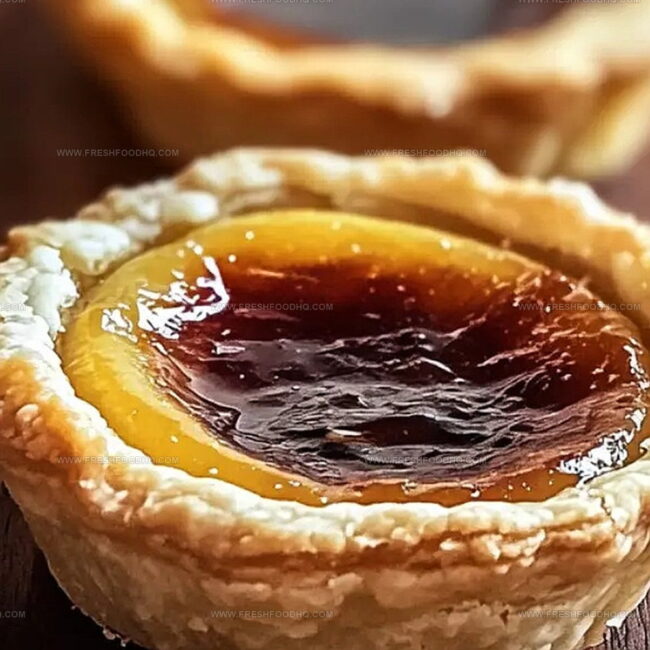
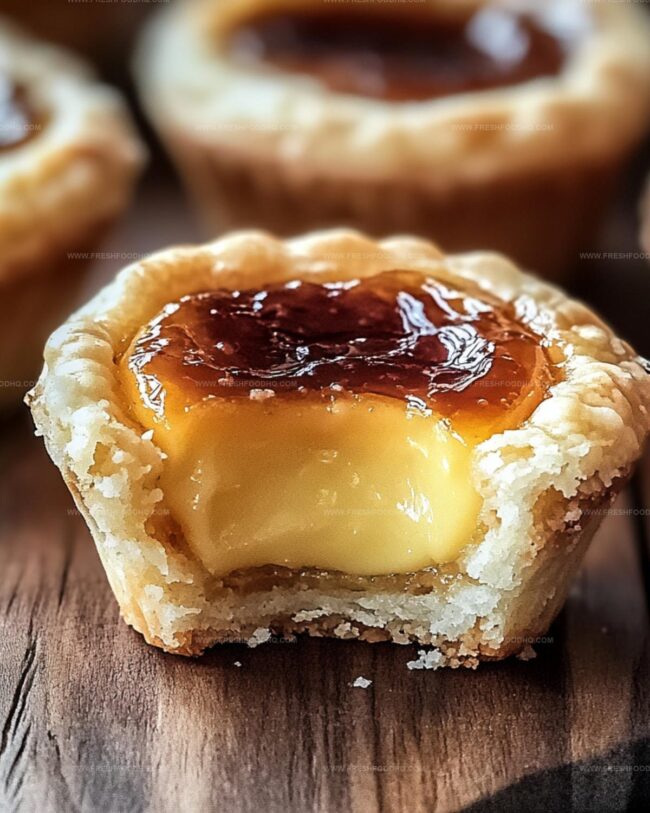
Flaky pastry cradles a gooey, caramelized filling that melts on your tongue with pure delight.
Crinkled edges and golden-brown surfaces hint at the magic waiting inside each bite.
Rich, buttery, and unmistakably canadian, these tarts connect you to a rich cultural heritage.
Whip up this recipe, and you’ll understand why butter tarts are a national treasure.
Classic Canadian Butter Tarts Everyone Will Love
Ingredients for Traditional Canadian Butter Tarts
For the Pastry:For the Liquid Ingredients:For the Filling (Not Shown in Instructions):How to Prepare Classic Canadian Butter Tarts
Step 1: Whip Up the Flour Base
Grab a spacious mixing bowl and toss in flour and salt. Dive in with a pastry cutter or your fingertips, breaking down cold butter until the mixture looks like rough, crumbly sand.
The key is creating those delightful little butter pockets that’ll make your crust wonderfully flaky.
Step 2: Merge Wet and Dry Ingredients
Combine ice water and vinegar in a separate small bowl.
Drizzle this liquid magic into your flour mixture, stirring gently. Your goal is a dough that just barely holds together – resist the urge to overmix!
Think gentle and light, like you’re coaxing the ingredients into a delicate dance.
Step 3: Chill and Rest the Dough
Form the dough into two smooth, round discs.
Wrap each one snugly in plastic wrap, giving them a cozy retreat to the refrigerator. Let them rest and relax for at least half an hour.
This downtime allows the gluten to settle and butter to firm up, ensuring a tender, melt-in-your-mouth crust.
Step 4: Roll Out the Pastry
Remove chilled dough from the refrigerator.
On a lightly floured surface, roll each disc into a thin, even circle. Aim for a thickness that’s thin enough to be delicate but strong enough to hold your luscious filling.
Step 5: Prepare Tart Shells
Carefully transfer the rolled dough into tart pans or a muffin tin. Gently press the dough into corners and edges, trimming any excess.
The shells should look neat and uniform, ready to cradle the sweet filling.
Step 6: Craft the Buttery Filling
Whisk together:Stir until the mixture is smooth and glossy, with a rich, caramel-like appearance.
Step 7: Fill and Bake
Pour the filling into prepared tart shells, filling each about two-thirds full. Bake in a preheated oven until the filling is set and the edges are golden brown and slightly bubbling.
Step 8: Cool and Enjoy
Allow tarts to cool in the pan for a few minutes, then transfer to a wire rack. The filling will continue to set as they cool.
Serve warm or at room temperature, and watch everyone’s eyes light up with the first delicious bite.
Tips to Achieve Perfect Butter Tarts Every Time

Flavorful Alternatives for Classic Canadian Butter Tarts
Pairings That Complement Canadian Butter Tarts
Proper Storage of Canadian Butter Tarts
Store leftover butter tarts in an airtight container in the refrigerator for up to 4 days. Place parchment paper between layers to prevent sticking.
Wrap individual tarts tightly in plastic wrap, then place in a freezer-safe container. Freeze for up to 3 months without losing flavor or texture.
Keep butter tarts at room temperature for 1-2 days if serving within a short time. Cover loosely with a clean kitchen towel to maintain freshness.
Warm refrigerated or frozen tarts in a preheated oven at 325°F for 5-7 minutes. This method helps restore the crispy crust and brings back the delicious warm flavor.
FAQs
The vinegar helps prevent gluten development, resulting in a more tender and flaky pastry that doesn’t shrink during baking.
Yes, you can prepare the dough discs up to 2 days in advance and store them in the refrigerator, which actually helps the gluten relax and makes the crust more tender.
Cold butter creates small pockets of fat that melt during baking, producing layers and a flaky texture in the pie crust.
Stop mixing when the dough just comes together and there are still visible butter pieces – this ensures a flaky, not tough, crust.
Print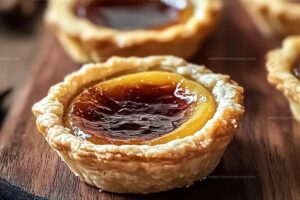
Classic Canadian Butter Tarts Recipe
- Total Time: 45 minutes
- Yield: 12 1x
Description
Sweet Canadian nostalgia melts into these classic butter tarts, where buttery pastry cradles a gooey filling of caramelized sugar and rich cream. Rich maple undertones and flaky crust invite you to savor a cherished Canadian culinary tradition.
Ingredients
Main Ingredients:
- 1 cup unsalted butter
- 2 large eggs
- 1 cup brown sugar
- 1/2 cup light corn syrup
Pastry Ingredients:
- 2 1/2 cups all-purpose flour
- 1/2 teaspoon salt
- 1/4 cup ice water
- 1 tablespoon white vinegar
Optional/Additional Ingredients:
- 1 teaspoon pure vanilla extract
- 1/4 teaspoon salt
- 1/2 cup raisins or chopped pecans
Instructions
- Create a loose, sandy texture by blending flour and salt, then incorporate cold butter through gentle cutting motions until the mixture resembles grainy breadcrumbs.
- Combine ice water and vinegar, then slowly integrate the liquid into the flour mixture, gently stirring until the dough just begins to form a cohesive mass, being careful not to overwork the mixture.
- Divide the dough into two equal portions, compressing each into a flat disc shape, then encase completely in plastic wrap and chill in the refrigerator for a minimum of 30 minutes to allow gluten to relax and butter to firm.
- After chilling, remove dough from refrigerator and let it rest at room temperature for 5-10 minutes to soften slightly for easier rolling.
- On a lightly floured surface, roll out each disc into a thin, even circular sheet approximately 1/8 inch thick, rotating the dough periodically to ensure uniform thickness.
- Carefully transfer the rolled dough into tart pans, gently pressing the pastry into corners and edges, trimming excess dough from the rim with a sharp knife.
- Crimp the edges of the pastry using your fingers or a fork to create a decorative border and prevent shrinkage during baking.
Notes
- Use unsalted butter for better control of salt content and to prevent the tart from becoming too salty.
- Chill the dough thoroughly to ensure a flaky, tender crust that doesn’t shrink during baking.
- Work quickly and keep ingredients cold to maintain the pastry’s delicate texture and prevent gluten development.
- For a gluten-free version, substitute all-purpose flour with a reliable gluten-free flour blend and add xanthan gum for binding.
- Prep Time: 45 minutes
- Cook Time: 0 minutes
- Category: Desserts, Snacks
- Method: Baking
- Cuisine: Canadian
Nutrition
- Serving Size: 12
- Calories: 282 kcal
- Sugar: 22 g
- Sodium: 96 mg
- Fat: 15 g
- Saturated Fat: 8 g
- Unsaturated Fat: 6 g
- Trans Fat: 0.3 g
- Carbohydrates: 35 g
- Fiber: 1 g
- Protein: 2 g
- Cholesterol: 45 mg
Ethan Caldwell
Founder & Culinary Innovator
Expertise
Farm-to-table cooking, Seasonal recipe creation, Culinary storytelling, Food photography and styling
Education
The Chef’s Academy (Indianapolis, IN)
Ethan didn’t just fall in love with food, he grew into it, surrounded by fields, farmers’ markets, and family meals that told a story.
After sharpening his skills at The Chef’s Academy, he took his passion straight into the farm-to-table movement, working side-by-side with local growers and seasonal flavors.
He believes every recipe should feel like a walk through a summer market: colorful, fresh, and full of possibility.
Outside the kitchen, Ethan’s idea of a perfect day is hiking mountain trails, digging into heirloom vegetables, and hosting casual dinners where seconds are always encouraged.