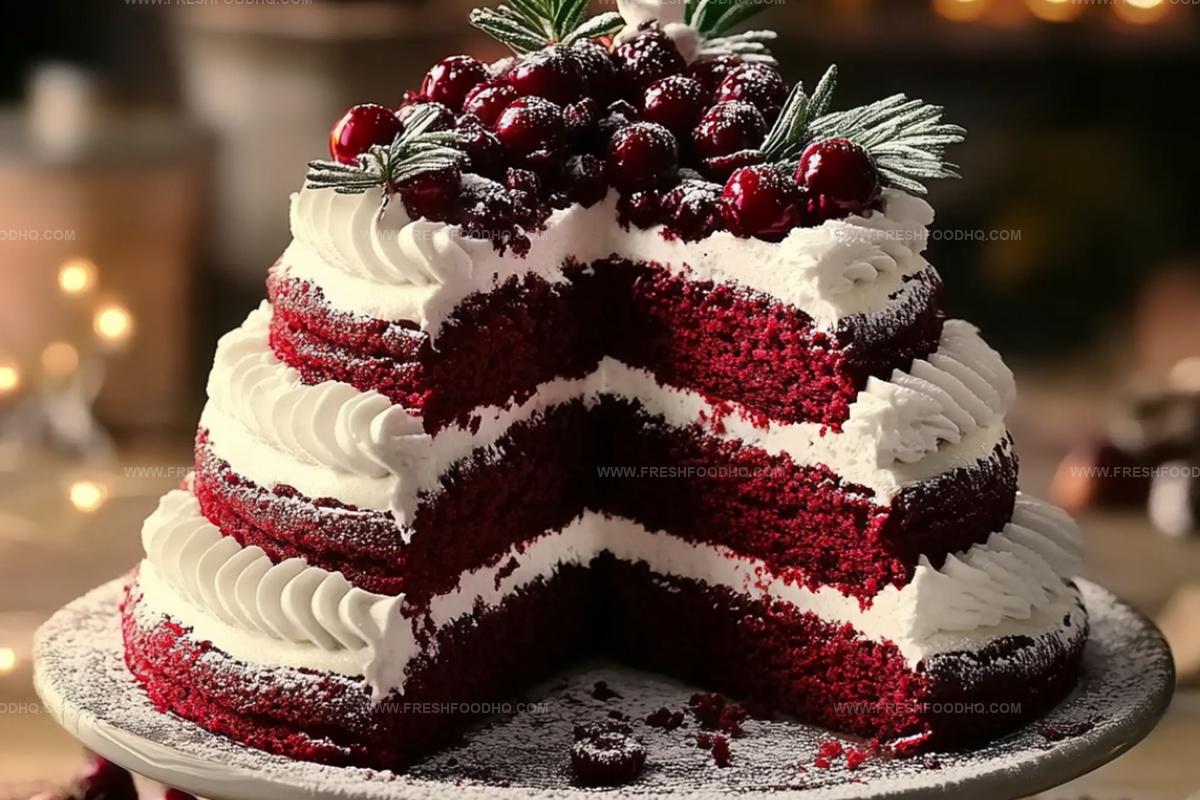
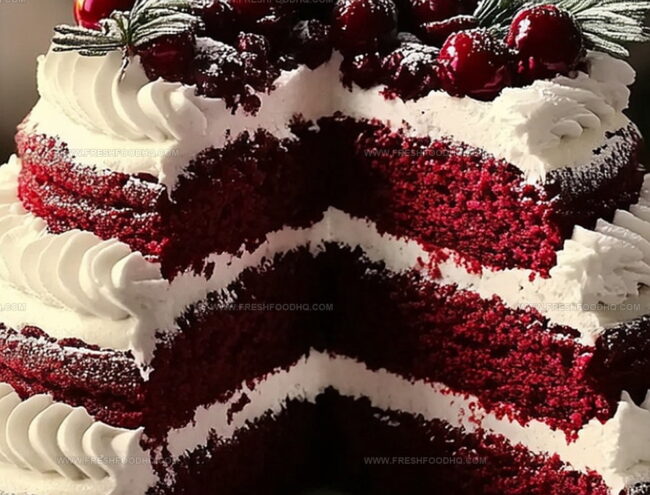
Festive Red Velvet Tree Cake Recipe for Sweet Holiday Joy
Sweet secrets of holiday baking reveal a mesmerizing red velvet tree cake that sparkles with festive charm.
Layers of crimson-hued goodness promise a delightful culinary adventure for anyone seeking seasonal magic.
Soft, velvety textures meld with rich cream cheese frosting in a dessert that looks almost too beautiful to slice.
Crafting this showstopping treat requires minimal kitchen skills and maximum enthusiasm.
Delicate swirls and elegant decorations transform an ordinary cake into a stunning centerpiece that will impress guests.
Each bite carries the warmth of winter celebrations and the joy of shared moments.
What Makes This Tree Cake Stand Out

What You’ll Need for Tree Cake
For the Cake Base:For the Wet Ingredients:For the Frosting:For the Decorations:Steps for Red Velvet Tree Cake

Step 1: Prepare Baking Workspace
Preheat the oven to 350F (175C). Grease multiple round cake pans in decreasing sizes.
Line each pan with parchment paper for easy cake removal.
Step 2: Mix Dry Ingredients
Grab a large mixing bowl and sift together:Ensure all dry ingredients are thoroughly combined and free of lumps.
Step 3: Combine Wet Ingredients
In a separate bowl, whisk together:Blend until the mixture looks smooth and vibrant red.
Step 4: Create Cake Batter
Slowly pour wet ingredients into dry ingredients.
Mix gently until the batter becomes completely smooth and well incorporated. Be careful not to overmix.
Step 5: Bake Cake Layers
Divide batter evenly among prepared pans. Bake each layer for 20-25 minutes.
Check doneness by inserting a toothpick into the center – it should come out clean.
Step 6: Cool Cake Layers
Allow cakes to rest in pans for 10 minutes.
Transfer to wire cooling rack and let them cool completely before frosting.
Step 7: Whip Cream Cheese Frosting
Beat cream cheese and butter until silky smooth.
Gradually add powdered sugar, continuing to mix until frosting becomes light and fluffy. Stir in vanilla extract for extra flavor.
Step 8: Assemble Tree-Shaped Cake
Start with the largest cake layer on a serving plate. Spread a thin layer of cream cheese frosting.
Stack subsequent layers, trimming edges to create a conical tree shape.
Step 9: Decorate Festive Cake
Use a piping bag with a star tip to create frosting swirls around the cake.
Sprinkle white chocolate shavings for a snowy effect. Add edible baubles and glitter stars for extra sparkle.
Place a star-shaped topper on the peak.
Step 10: Serve and Enjoy
Slice the beautiful red velvet tree cake and delight in its festive layers and creamy frosting.
Tips for Making a Better Tree Cake
Tasty Swaps for Red Velvet Cake
Red Velvet Holiday Tree Cake Variations:Pair This Cake with Iced Drinks
Best Way to Store Tree Cake
Store the cake in an airtight container in the refrigerator for up to 4 days. Cover loosely with plastic wrap or aluminum foil to prevent drying out.
Wrap the entire cake tightly in plastic wrap, then cover with aluminum foil. Freeze for up to 2 months. Thaw in the refrigerator overnight before serving.
Wrap each slice separately in plastic wrap, then place in a freezer-safe container. Freeze for up to 1 month. Thaw at room temperature for 30-45 minutes.
Warm individual slices in the microwave for 15-20 seconds on low power. For best texture, let the cake come to room temperature naturally to maintain its moisture and prevent soggy frosting.
FAQs
Red velvet cake gets its unique flavor and color from a combination of cocoa powder, buttermilk, and a small amount of vinegar, which creates a subtle tangy taste and deep red color.
Use a kitchen scale to weigh each cake pan of batter or carefully divide the batter using measuring cups to create uniform layers.
Vinegar helps activate the baking soda, creating a tender crumb and enhancing the cake’s soft texture by breaking down the gluten in the flour.
While food coloring gives the signature red color, you can use natural alternatives like beetroot powder to achieve a similar red hue without artificial coloring.
Print
Red Velvet Tree Cake Recipe
- Total Time: 1 hour 10 minutes
- Yield: 12 1x
Description
Festive red velvet tree cake brings winter magic to holiday desserts with rich crimson layers and smooth cream cheese frosting. Elegant swirls and delicate decorations invite celebration, promising delightful moments shared around your seasonal table.
Ingredients
Cake Ingredients:
- 2.5 cups (315g) all-purpose flour
- 1.5 cups (300g) granulated sugar
- 1.5 cups (360ml) vegetable oil
- 1 cup (240ml) buttermilk
- 2 large eggs
- 2 tablespoons (30ml) red food coloring
- 1 teaspoon baking soda
- 1 teaspoon salt
- 1 teaspoon cocoa powder
- 1 teaspoon white vinegar
- 2 teaspoons vanilla extract
Frosting Ingredients:
- 8 ounces (225g) cream cheese
- 0.5 cup (115g) unsalted butter
- 4 cups (500g) powdered sugar
- 2 teaspoons vanilla extract
Decoration Ingredients:
- Edible silver baubles
- Edible red baubles
- Small edible glitter stars
- White chocolate shavings
- Star-shaped topper
Instructions
- Prepare the oven to 350F (175C) and prepare round cake pans of progressively smaller diameters, greasing and lining each with parchment paper.
- Combine dry ingredients in a large mixing bowl, sifting flour, sugar, baking soda, salt, and cocoa powder together to ensure smooth texture.
- Whisk wet ingredients separately, blending vegetable oil, buttermilk, eggs, vibrant red food coloring, vinegar, and vanilla extract until thoroughly incorporated.
- Merge wet and dry mixtures, stirring gently until achieving a uniform, silky batter without overmixing.
- Distribute batter evenly across prepared pans, ensuring consistent layer thickness.
- Bake layers for 20-25 minutes, checking doneness with a toothpick that should emerge clean when inserted into cake centers.
- Allow cakes to rest in pans for 10 minutes, then transfer to wire cooling racks until completely cooled.
- Prepare cream cheese frosting by beating cream cheese and butter until creamy and smooth.
- Gradually incorporate powdered sugar, whipping until frosting becomes light and fluffy.
- Blend vanilla extract into frosting for enhanced flavor.
- Assemble cake by positioning largest layer on serving plate, spreading thin frosting layer between each subsequent tier.
- Trim cake edges to create elegant conical tree silhouette.
- Use star-tipped piping bag to create textured frosting swirls around cake’s exterior.
- Embellish with edible decorative elements like sparkly baubles, white chocolate shavings, and glittery stars.
- Crown cake with decorative star-shaped topper for festive presentation.
Notes
- Mastering Cake Layer Precision matters when creating the tree shape, so ensure each cake pan is slightly smaller to achieve a perfect conical silhouette.
- Temperature Control is crucial; let ingredients like eggs and buttermilk reach room temperature for smoother batter and more consistent texture.
- Color Enhancement can be achieved by adding extra cocoa powder or using gel food coloring for deeper red velvet color without altering batter consistency.
- Decoration Alternatives include using crushed candy canes, edible silver pearls, or white chocolate shards for different festive looks that match various holiday themes.
- Prep Time: 45 minutes
- Cook Time: 25 minutes
- Category: Desserts
- Method: Baking
- Cuisine: American
Nutrition
- Serving Size: 12
- Calories: 422
- Sugar: 38 g
- Sodium: 178 mg
- Fat: 22 g
- Saturated Fat: 10 g
- Unsaturated Fat: 11 g
- Trans Fat: 0 g
- Carbohydrates: 52 g
- Fiber: 1 g
- Protein: 4 g
- Cholesterol: 45 mg
Ethan Caldwell
Founder & Culinary Innovator
Expertise
Farm-to-table cooking, Seasonal recipe creation, Culinary storytelling, Food photography and styling
Education
The Chef’s Academy (Indianapolis, IN)
Ethan didn’t just fall in love with food, he grew into it, surrounded by fields, farmers’ markets, and family meals that told a story.
After sharpening his skills at The Chef’s Academy, he took his passion straight into the farm-to-table movement, working side-by-side with local growers and seasonal flavors.
He believes every recipe should feel like a walk through a summer market: colorful, fresh, and full of possibility.
Outside the kitchen, Ethan’s idea of a perfect day is hiking mountain trails, digging into heirloom vegetables, and hosting casual dinners where seconds are always encouraged.