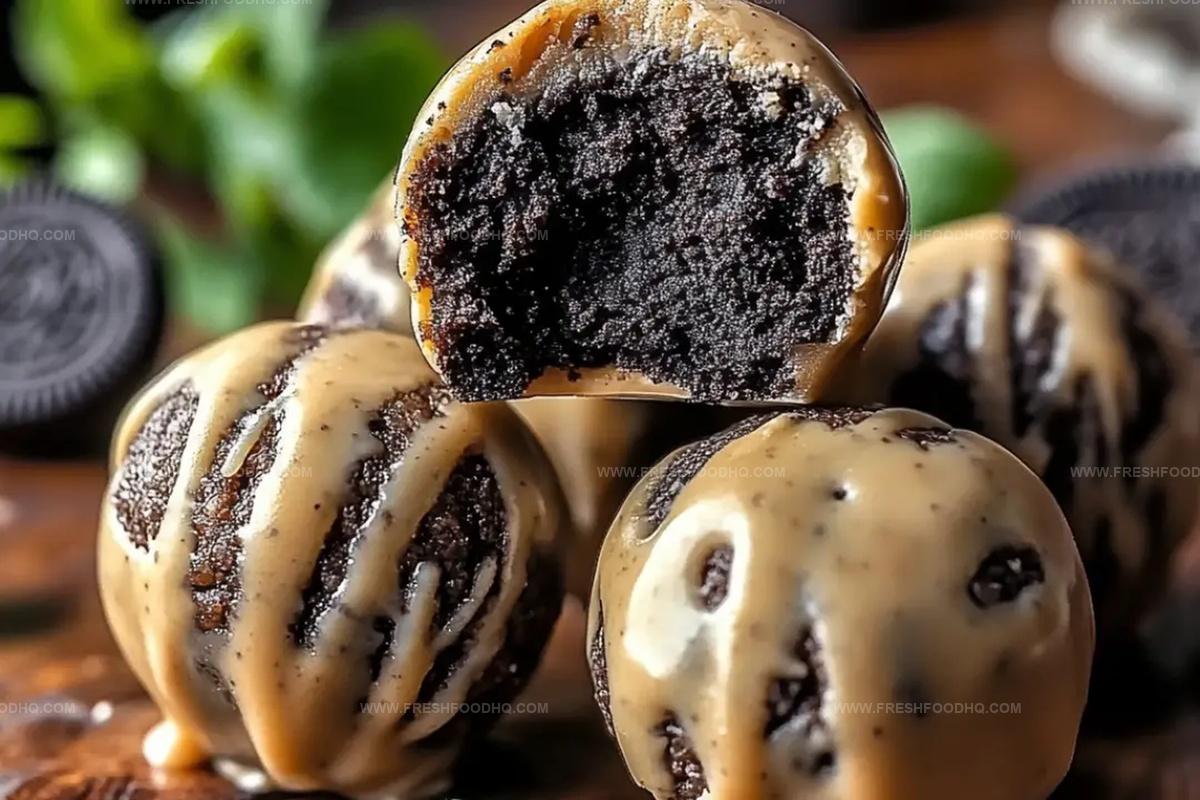
The Tastiest 3-Ingredient Peanut Butter Oreo Cookie Balls Recipe
Whipping up delectable peanut butter oreo cookie balls requires minimal effort and maximum enjoyment.
Sweet treats like these spark instant happiness in any kitchen.
Creamy textures blend perfectly with crunchy cookie crumbles for an irresistible snack.
No complicated techniques stand between you and these delightful morsels.
Simple ingredients promise maximum flavor without complex preparation methods.
Chocolate coating adds a luxurious finish that makes these little bites absolutely magical.
Jump into this quick recipe and create something everyone will absolutely adore.
Why Peanut Butter Oreo Balls Are So Fun
3 Ingredients You Need for Oreo Cookie Balls
For the Base:For the Coating:For the Optional Finishing:How to Make Peanut Butter Oreo Cookie Balls
Step 1: Crush the Oreos
Grab your food processor or a Ziploc bag and rolling pin. Pulverize the Oreos into fine, sandy crumbs.
If using a bag, press and roll firmly to break the cookies into consistent small pieces.
Step 2: Blend Creamy Mixture
Combine the crushed Oreos with peanut butter in a mixing bowl.
Stir thoroughly until the mixture transforms into a cohesive, thick dough that holds together easily.
Step 3: Shape Delightful Bites
Using clean hands, roll the mixture into small round balls.
Each ball should be roughly the size of a golf ball. Place these on a parchment-lined baking sheet, ensuring they don’t touch each other.
Step 4: Prepare Chocolate Coating
Select a microwave-safe bowl for melting chocolate chips. Heat in short 20-second bursts, stirring between each interval.
Continue until the chocolate becomes completely smooth and glossy.
Step 5: Chocolate Dipping Technique
Carefully dip each cookie ball into the melted chocolate.
Use a fork to lift and gently tap off excess chocolate. Return the chocolate-covered balls to the parchment-lined sheet.
Step 6: Chill and Set
Place the cookie balls in the refrigerator for 30 minutes or the freezer for a faster 15-minute setting. The chocolate should become firm and create a crisp outer shell.
Step 7: Serve and Savor
Once hardened, transfer the cookie balls to a serving plate. These treats are perfect for parties, dessert tables, or a personal indulgent snack.
Tips for Easy Peanut Butter Oreo Cookie Balls
Variations for Oreo Cookie Peanut Butter Balls
Pairing Snacks for Peanut Butter Oreo Balls
Storage Tips for Peanut Butter Oreo Cookie Balls
Store in an airtight container in the fridge for up to 5 days. Place parchment paper between layers to prevent sticking.
Wrap each cookie ball individually in plastic wrap, then store in a freezer-safe container for up to 3 months. Keeps texture and flavor intact.
Transfer frozen cookie balls to the refrigerator overnight. Let sit at room temperature for 10-15 minutes before serving for best taste and texture.
Microwave for 5-10 seconds if you prefer a slightly warm treat. Be careful not to overheat, as chocolate can quickly burn or become grainy.
FAQs
Yes, you can experiment with flavors like Mint, Peanut Butter, or Double Stuffed Oreos to create unique variations of the cookie balls.
No, you just need a food processor or a rolling pin to crush the Oreos, and a mixing bowl to combine ingredients. A microwave or double boiler works for melting chocolate.
Absolutely! Kids will love helping crush the Oreos, mixing the ingredients, and rolling the balls. It’s a simple, fun recipe with minimal cooking involved.
Place the cookie balls on a parchment-lined baking sheet with some space between them to prevent sticking during the chilling process.
Print
3-Ingredient Peanut Butter Oreo Cookie Balls Recipe
- Total Time: 20 minutes
- Yield: 24 1x
Description
Indulgent 3-ingredient peanut butter oreo cookie balls deliver a nostalgic dessert experience with minimal effort. Creamy peanut butter and crushed oreos combine into irresistible bite-sized treats you can whip up in minutes for instant chocolate-craving satisfaction.
Ingredients
Chocolate Coating:
- 1 1/2 cups chocolate chips (milk, dark, or white chocolate)
- 1 1/2 cups (340 grams) chocolate chips
Main Ingredients:
- 1 package (15.25 ounces / 432 grams) Oreo cookies
- 1 cup (240 milliliters) creamy peanut butter
Instructions
- Transform Oreo cookies into fine, uniform crumbs using a food processor or by crushing within a sealed plastic bag with a rolling pin, ensuring no large chunks remain.
- Blend crushed Oreo crumbs with creamy peanut butter in a mixing bowl, kneading thoroughly until the mixture forms a cohesive, moldable dough with consistent texture.
- Carefully craft uniform spheres approximately 1-inch in diameter, placing each delicately on a parchment-lined baking sheet to maintain consistent shape.
- Utilize microwave in brief 20-second increments to gently melt chocolate chips, stirring between intervals until achieving a smooth, glossy liquid consistency.
- Delicately submerge each prepared ball into melted chocolate, rotating to ensure complete coverage, then gently tap to remove excess chocolate coating.
- Position chocolate-enrobed balls back onto parchment sheet, maintaining space between each piece to prevent contact.
- Refrigerate for approximately 30 minutes or expedite setting by freezing for 15 minutes until chocolate hardens and develops a crisp shell.
- Serve chilled and savor the decadent combination of chocolate, peanut butter, and Oreo flavors.
Notes
- Crush Oreos thoroughly to ensure a smooth, even texture without large cookie chunks that might disrupt the ball’s shape.
- Use room temperature peanut butter for easier mixing and better binding with crushed Oreos, creating a more consistent dough.
- Wet your hands slightly when rolling balls to prevent sticky mixture from clinging to your fingers and achieve uniform, neat shapes.
- For gluten-free option, swap regular Oreos with gluten-free chocolate sandwich cookies to accommodate dietary restrictions without compromising taste.
- Prep Time: 20 minutes
- Cook Time: 0 minutes
- Category: Snacks, Desserts
- Method: Blending
- Cuisine: American
Nutrition
- Serving Size: 24
- Calories: 159
- Sugar: 14 g
- Sodium: 80 mg
- Fat: 9 g
- Saturated Fat: 3 g
- Unsaturated Fat: 5 g
- Trans Fat: 0 g
- Carbohydrates: 18 g
- Fiber: 1 g
- Protein: 4 g
- Cholesterol: 5 mg
Ethan Caldwell
Founder & Culinary Innovator
Expertise
Farm-to-table cooking, Seasonal recipe creation, Culinary storytelling, Food photography and styling
Education
The Chef’s Academy (Indianapolis, IN)
Ethan didn’t just fall in love with food, he grew into it, surrounded by fields, farmers’ markets, and family meals that told a story.
After sharpening his skills at The Chef’s Academy, he took his passion straight into the farm-to-table movement, working side-by-side with local growers and seasonal flavors.
He believes every recipe should feel like a walk through a summer market: colorful, fresh, and full of possibility.
Outside the kitchen, Ethan’s idea of a perfect day is hiking mountain trails, digging into heirloom vegetables, and hosting casual dinners where seconds are always encouraged.