The Easiest No-Bake Peanut Butter Balls Recipe You’ll Love
Sweet and nutty peanut butter balls dance between indulgence and childhood nostalgia, capturing the perfect blend of creamy richness.
Simple ingredients come together in minutes for a no-bake treat that melts hearts.
Anyone can master this delightful recipe with minimal kitchen skills.
Chocolate and peanut butter create a magical combination that satisfies deep cravings.
Your family will devour these bite-sized delights faster than you can roll them.
Small gatherings or solo snacking become extraordinary moments with these irresistible treats.
We promise these peanut butter balls will become your new favorite quick dessert.
What Makes Peanut Butter Balls So Irresistible
Key Ingredients for Peanut Butter Balls
Main Ingredients:Flavoring Ingredients:Coating Ingredients:Preparation Ingredient:Step-by-Step Peanut Butter Balls Preparation
Step 1: Blend Smooth Base
In a spacious mixing bowl, combine powdered sugar, creamy peanut butter, softened butter, and a splash of vanilla extract. Use a sturdy spatula or electric mixer to blend ingredients until they form a uniform, silky mixture that holds together easily.
Step 2: Shape Delightful Orbs
Scoop small portions of the mixture and roll between your palms to create perfectly round balls. Gently place each orb onto a parchment-lined baking sheet, ensuring they’re not touching each other.
Step 3: Chill and Firm
Transfer the baking sheet to the refrigerator and let the peanut butter balls cool and solidify for approximately 30 minutes. This helps them maintain their shape during the chocolate dipping process.
Step 4: Prepare Chocolate Coating
Select your favorite chocolate for dipping – dark, milk, or semi-sweet work wonderfully. Melt the chocolate using a double boiler or microwave, stirring frequently to achieve a smooth, glossy consistency.
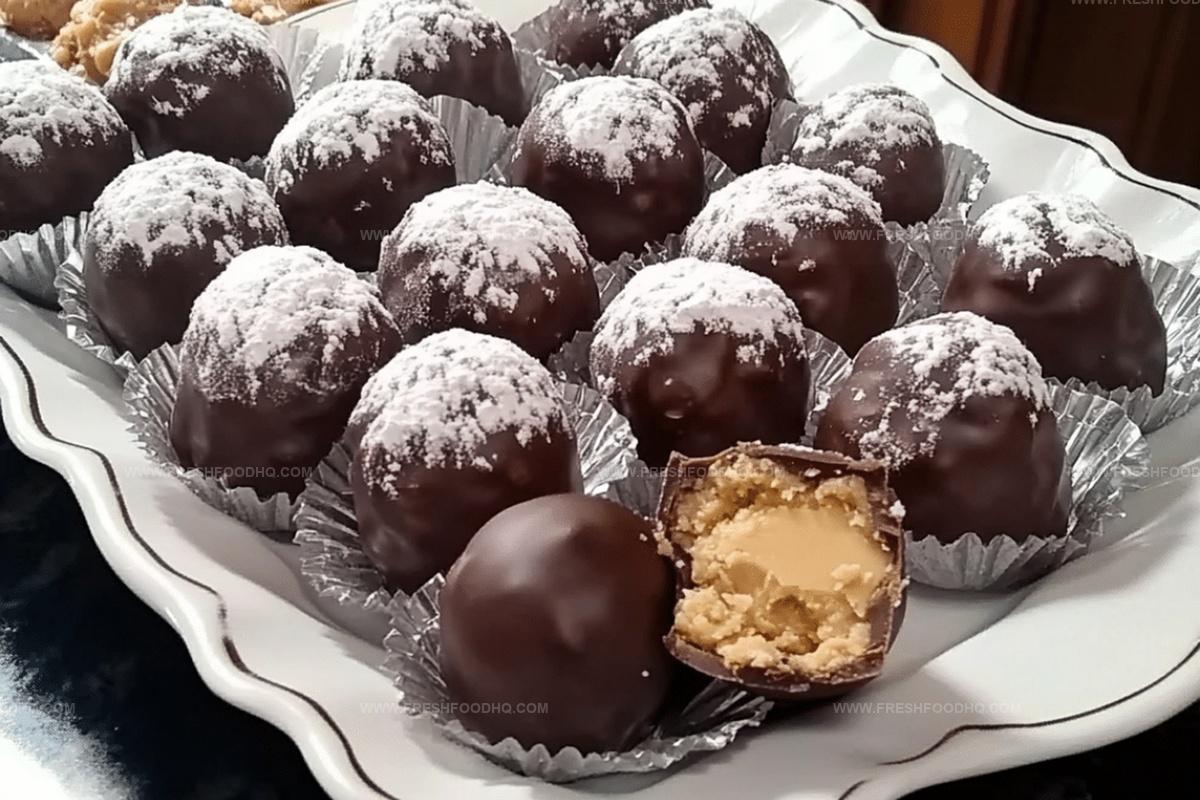
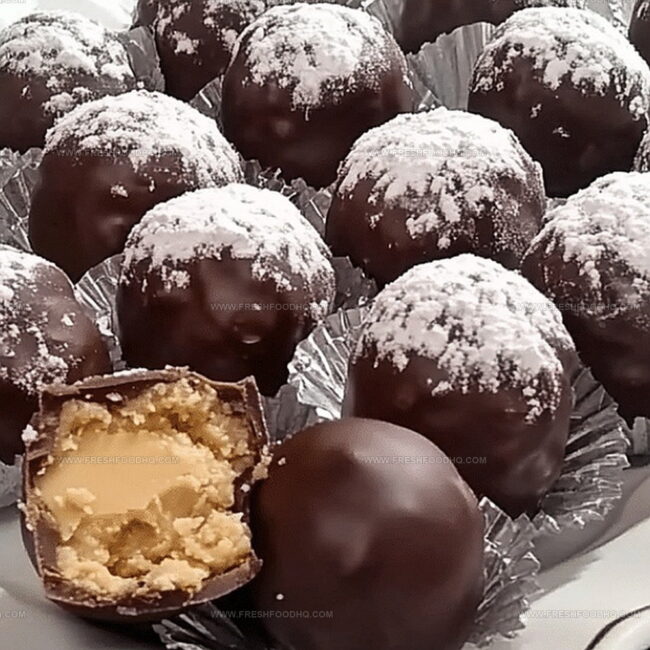
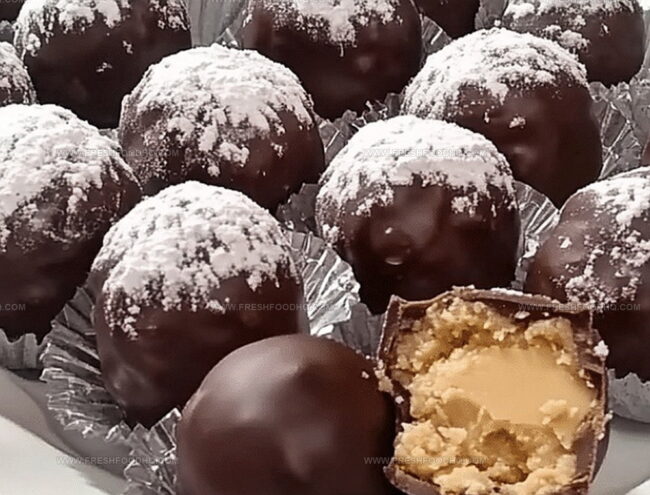
Step 5: Dunk and Cover
Using a fork or dipping tool, carefully lower each chilled peanut butter ball into the melted chocolate. Rotate gently to ensure complete and even coverage, allowing excess chocolate to drip off.
Step 6: Set and Harden
Return the chocolate-coated balls to the parchment-lined baking sheet. Let them rest at room temperature or in the refrigerator until the chocolate shell becomes firm and glossy.
Step 7: Savor and Share
Indulge in these decadent peanut butter balls immediately or store in an airtight container in the refrigerator for up to one week. Perfect for parties, gifts, or a sweet personal treat!
Expert Tips for Perfect Peanut Butter Balls
Flavorful Variations of Peanut Butter Balls
Pairing Suggestions for Peanut Butter Balls
Best Storage Practices for Peanut Butter Balls
FAQs About Peanut Butter Balls
Use a non-stick parchment paper or lightly spray the paper with cooking spray before placing the balls on it.
Yes, you can use milk chocolate, dark chocolate, or white chocolate depending on your preference.
Use chocolate melted at a low temperature and dip the balls quickly, allowing excess chocolate to drip off before placing them back on the parchment paper.
They can be kept in an airtight container in the refrigerator for up to 2 weeks, maintaining their delicious flavor and texture.
Print
Peanut Butter Balls Recipe
- Total Time: 55 minutes
- Yield: 24 1x
Description
Indulgent peanut butter balls blend creamy richness with chocolate-dipped perfection, creating a nostalgic treat that whisks you back to childhood kitchens. Sweet memories melt together with simple ingredients, promising pure bliss in every delightful bite.
Ingredients
Peanut Butter Filling:
- 1 cup peanut butter
- 6 tablespoons (84 grams) butter, melted
- 1 teaspoon vanilla extract
Sweetener:
- 2 cups (240 grams) powdered sugar
Coating:
- Dipping chocolate of choice
Instructions
- Combine powdered sugar, peanut butter, melted butter, and vanilla extract in a spacious mixing bowl, stirring until the ingredients form a uniform, smooth consistency.
- Gently shape the mixture into compact, bite-sized spheres, positioning them carefully on a parchment-lined baking sheet.
- Refrigerate the formed balls for approximately 30 minutes to firm up their structure and enhance flavor melding.
- Carefully melt the chocolate using a double boiler or microwave, ensuring a smooth, glossy texture.
- Delicately immerse each chilled peanut butter ball into the melted chocolate, rotating to achieve complete, even coverage.
- Return the chocolate-coated balls to the parchment-lined sheet, allowing excess chocolate to drip off.
- Let the chocolate set at room temperature or briefly chill in the refrigerator until the coating hardens completely.
- Store in an airtight container in the refrigerator for optimal texture and freshness.
- Serve chilled and savor the decadent combination of creamy peanut butter and rich chocolate.
Notes
- Experiment with different nut butters like almond or cashew for unique flavor variations and dietary alternatives.
- Use dark chocolate or sugar-free chocolate for a lower-sugar option that caters to health-conscious individuals.
- Ensure ingredients are at room temperature for smoother mixing and easier ball formation, preventing crumbly textures.
- Add a pinch of sea salt or sprinkle crushed nuts on top of chocolate coating for extra crunch and flavor complexity.
- Prep Time: 15 minutes
- Cook Time: 10 minutes
- Category: Snacks, Desserts
- Method: Chilling
- Cuisine: American
Nutrition
- Serving Size: 24
- Calories: 174
- Sugar: 15 g
- Sodium: 40 mg
- Fat: 11 g
- Saturated Fat: 3.5 g
- Unsaturated Fat: 7 g
- Trans Fat: 0.1 g
- Carbohydrates: 17 g
- Fiber: 1.5 g
- Protein: 4.5 g
- Cholesterol: 8 mg
Samantha Lee
Recipe Developer & Content Creator
Expertise
Plant-based and vegetarian recipes, Recipe testing and development, Food blogging and digital content creation, Culinary education and workshops
Education
Oregon Culinary Institute (Portland, OR)
Samantha sees cooking like painting, every fresh herb, every juicy tomato, a new splash of color on a canvas.
After graduating from Oregon Culinary Institute, she blended her love of global cuisines and plant-based cooking into recipes that feel fresh, fearless, and full of heart.
Samantha’s kitchen is a place where comfort food gets a modern remix and every meal feels like a little adventure. When she’s not cooking, she’s out exploring farmers’ markets, sketching new recipe ideas, or getting her hands dirty in a community garden.