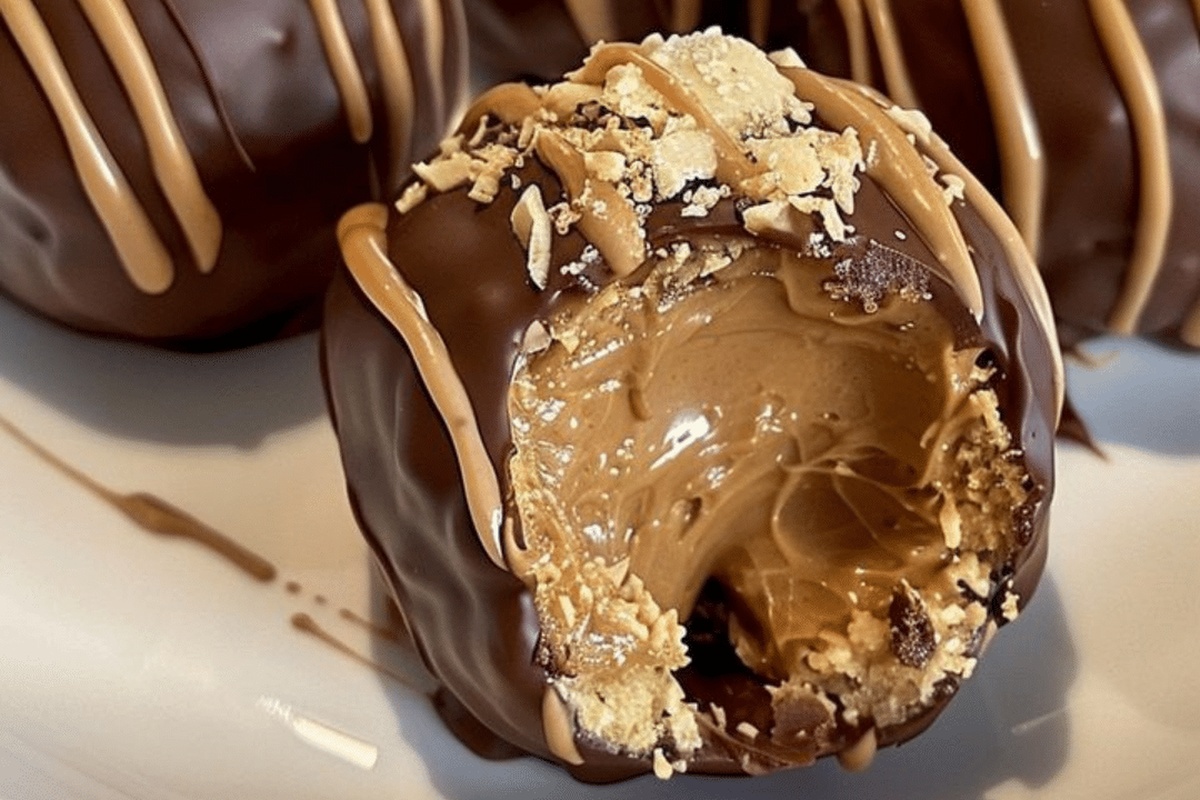
Dreamy No-Bake Peanut Butter Cheesecake Balls Recipe
Creamy no-bake peanut butter cheesecake balls dance between decadent dessert and playful snack.
Small bites pack intense flavor without complicated kitchen techniques.
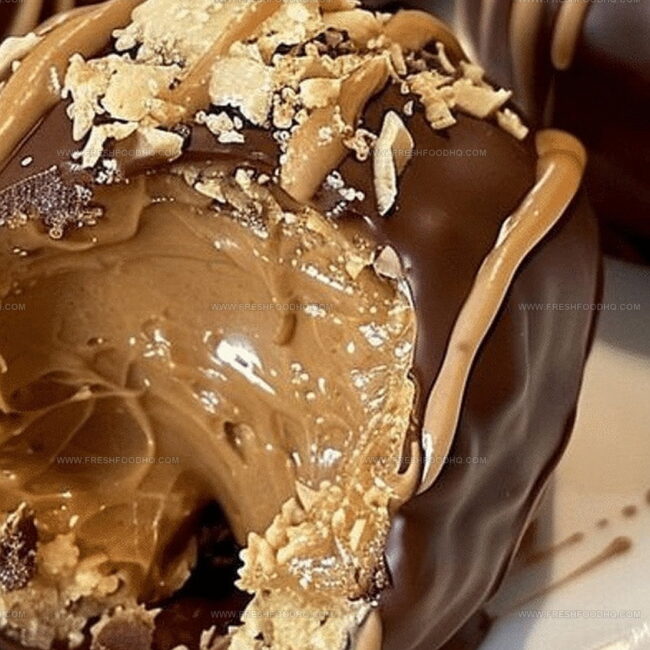
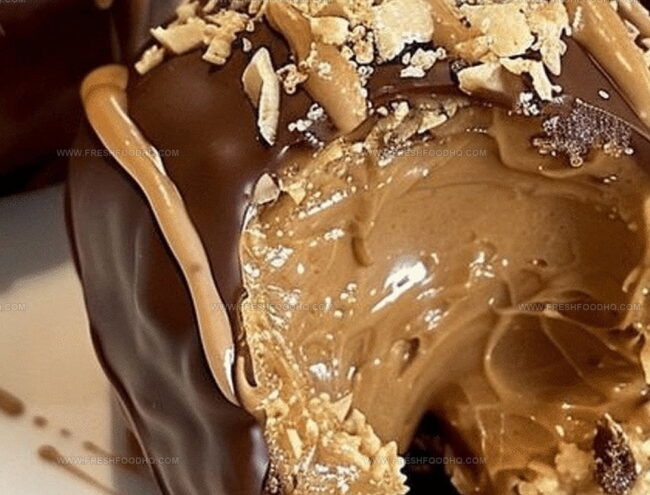
Silky cream cheese blends seamlessly with rich peanut butter for an irresistible treat.
Chilled and rolled into perfect spheres, these little delights melt in your mouth.
Cool ingredients combine quickly, making preparation a breeze for busy cooks.
Simple pantry staples transform into an elegant dessert that impresses everyone.
One taste, and you’ll understand why these sweet morsels become instant favorites.
Whip up a batch and watch them disappear in moments.
Why No-Bake Peanut Butter Cheesecake Balls Are An Easy Treat
Ingredients For No-Bake Peanut Butter Cheesecake Balls
Base Ingredients:Binding and Texture Ingredients:Coating Ingredient:Step By Step Directions For No-Bake Peanut Butter Cheesecake Balls
Step 1: Whip Up Creamy Base
In a spacious mixing bowl, blend together smooth peanut butter, soft cream cheese, and a splash of vanilla extract. Use an electric mixer or whisk to create a silky, well-combined mixture that’s free of any lumps.
Step 2: Create Dough-Like Consistency
Gradually fold in powdered sugar and crushed graham crackers. Mix thoroughly until the ingredients form a cohesive, moldable texture that holds together easily when pressed.
Step 3: Shape Delightful Spheres
Use clean hands to roll the mixture into bite-sized spheres. Aim for uniform sizes around an inch in diameter. Gently place each ball on a parchment-lined baking sheet, ensuring they’re not touching.
Step 4: Chill and Firm
Transfer the baking sheet to the refrigerator. Let the balls cool and set for at least 30 minutes, which helps them maintain their shape during the chocolate coating process.
Step 5: Melt Chocolate Coating
Select a microwave-safe bowl and pour in chocolate chips. Melt the chocolate in 30-second intervals, stirring between each session to prevent burning and ensure smooth consistency.
Step 6: Dunk and Cover
Carefully dip each chilled cheesecake ball into the melted chocolate. Use a fork or dipping tool to ensure complete and even coverage. Gently tap off excess chocolate.
Step 7: Final Cooling
Return the chocolate-coated balls to the parchment-lined baking sheet. Place back in the refrigerator until the chocolate shell hardens completely, typically 10-15 minutes.
Step 8: Serve and Indulge
Remove the cheesecake balls from the refrigerator and serve immediately. These decadent treats are perfect for parties, dessert, or a sweet personal indulgence.
Helpful Advice For No-Bake Peanut Butter Cheesecake Balls
Different Takes On No-Bake Peanut Butter Cheesecake Balls
Pairing Ideas For No-Bake Peanut Butter Cheesecake Balls
Storage Guidelines For No-Bake Peanut Butter Cheesecake Balls
Frequently Asked Questions On No-Bake Peanut Butter Cheesecake Balls
Peanut butter, cream cheese, vanilla extract, powdered sugar, graham cracker crumbs, and chocolate chips are the main ingredients needed to make these delicious no-bake cheesecake balls.
This recipe contains dairy (cream cheese) and may not be suitable for those with lactose intolerance or dairy allergies. It also includes peanut butter, so it’s not safe for people with nut allergies.
These cheesecake balls can be stored in an airtight container in the refrigerator for up to 5-7 days, maintaining their texture and flavor.
Print
No-Bake Peanut Butter Cheesecake Balls Recipe
- Total Time: 50 minutes
- Yield: 24 1x
Description
Creamy no-bake peanut butter cheesecake balls deliver pure dessert bliss with minimal kitchen effort. Rich chocolate coating and silky cream cheese center make these bite-sized treats irresistible for weekend snacking or elegant party sharing.
Ingredients
Main Ingredients:
- 1 cup creamy peanut butter
- 8 ounces (226 grams) cream cheese, softened
- 2 cups graham cracker crumbs
Sweeteners:
- 1 cup powdered sugar
Flavoring and Coating:
- 1 cup chocolate chips
- 1 teaspoon vanilla extract
Instructions
- Thoroughly blend peanut butter, cream cheese, and vanilla extract in a spacious mixing vessel until achieving a silky, uniform consistency.
- Incrementally fold in powdered sugar and graham cracker crumbs, ensuring complete integration without overmixing.
- Craft compact, uniform spheres from the mixture, arranging them methodically on a parchment-lined tray.
- Refrigerate the spherical treats for approximately 30 minutes to firm their structure, enhancing handling capabilities.
- Utilize microwave technique to liquify chocolate chips, executing 30-second intervals and stirring between each session to prevent scorching.
- Methodically immerse each chilled sphere into molten chocolate, rotating to guarantee comprehensive, even coating.
- Return chocolate-enrobed spheres to refrigerated tray, allowing chocolate to solidify completely – approximately 10-15 minutes.
- Once chocolate has crystallized, transfer delicacies to serving platter, presenting these delectable peanut butter cheesecake orbs for immediate consumption.
Notes
- Chill the mixing bowl and utensils beforehand to keep the mixture firm and easier to handle.
- Use room temperature cream cheese and peanut butter for smoother blending without lumps.
- Adjust sweetness by gradually adding powdered sugar and tasting the mixture to suit your preference.
- For gluten-free option, replace graham cracker crumbs with almond flour or gluten-free cookie crumbs.
- Prep Time: 15 minutes
- Cook Time: 5 minutes
- Category: Snacks, Desserts
- Method: Chilling
- Cuisine: American
Nutrition
- Serving Size: 24
- Calories: 180 kcal
- Sugar: 12 g
- Sodium: 75 mg
- Fat: 13 g
- Saturated Fat: 4 g
- Unsaturated Fat: 8 g
- Trans Fat: 0 g
- Carbohydrates: 14 g
- Fiber: 1 g
- Protein: 5 g
- Cholesterol: 15 mg
Samantha Lee
Recipe Developer & Content Creator
Expertise
Plant-based and vegetarian recipes, Recipe testing and development, Food blogging and digital content creation, Culinary education and workshops
Education
Oregon Culinary Institute (Portland, OR)
Samantha sees cooking like painting, every fresh herb, every juicy tomato, a new splash of color on a canvas.
After graduating from Oregon Culinary Institute, she blended her love of global cuisines and plant-based cooking into recipes that feel fresh, fearless, and full of heart.
Samantha’s kitchen is a place where comfort food gets a modern remix and every meal feels like a little adventure. When she’s not cooking, she’s out exploring farmers’ markets, sketching new recipe ideas, or getting her hands dirty in a community garden.