
Easy No-Bake Peanut Butter Bars Recipe: Irresistible Sweet Treat
Crafting delectable no-bake peanut butter bars can turn an ordinary afternoon into a sweet adventure.
Creamy textures and rich flavors combine in this simple dessert that requires minimal effort.
Chocolate and peanut butter create a classic combination everyone adores.
Quick preparation means you’ll have a delightful treat ready in minutes.
Kitchen novices and experienced bakers alike can master these irresistible bars.
Minimal ingredients and zero oven time make this recipe a perfect go-to solution for sudden sugar cravings.
Prepare to indulge in a mouthwatering experience that promises pure deliciousness.
Why No-Bake Peanut Butter Bars Are An Easy Sweet
Ingredients For No-Bake Peanut Butter Bars
Base Ingredients:Chocolate Topping:Optional Garnish:Preparation Guide For No-Bake Peanut Butter Bars
Step 1: Combine Creamy Base
Grab a medium saucepan and gently melt peanut butter, honey, and butter over medium heat. Stir the ingredients continuously until they blend smoothly and create a silky mixture that looks glossy and rich.
Step 2: Introduce Hearty Oats
Take the saucepan off the heat and fold in the oats. Mix thoroughly so every oat gets coated with the delicious peanut butter mixture, creating a consistent texture throughout.
Step 3: Create Solid Foundation
Transfer the mixture into a 9×9 inch pan. Use a spatula or your hands to press down firmly and evenly, ensuring the base is compact and smooth with no loose areas.
Step 4: Craft Chocolate Topping
In a small saucepan, melt chocolate chips and additional peanut butter together. Stir gently until the mixture becomes completely smooth and has a glossy, liquid-like consistency.
Step 5: Layer Chocolate Glaze
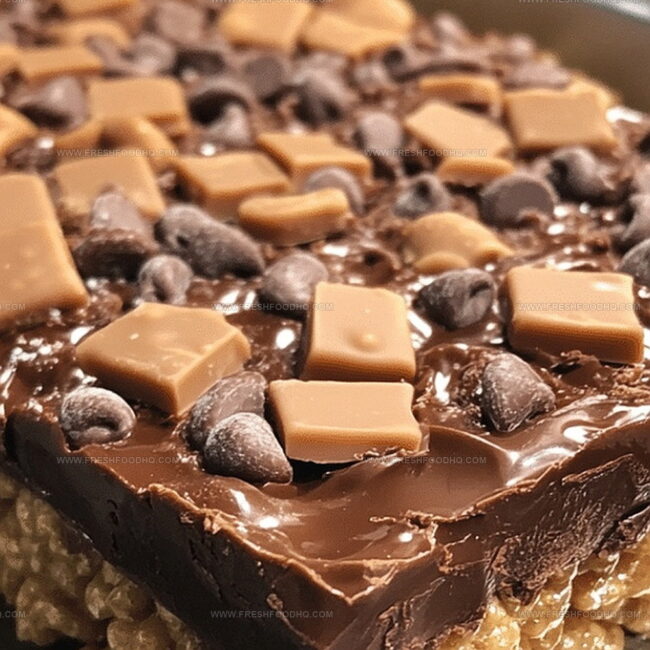
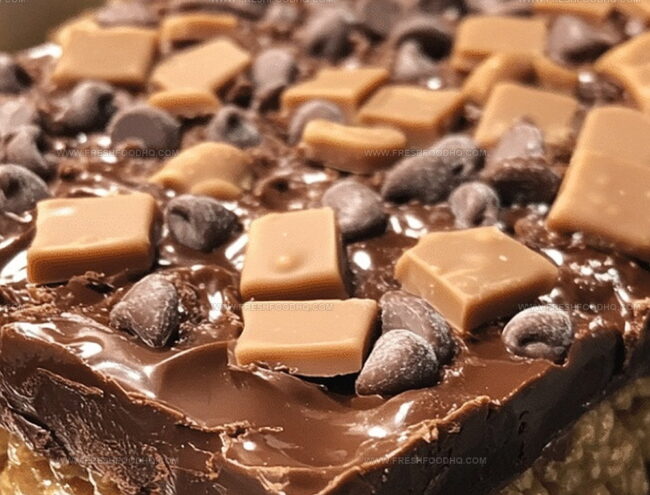
Pour the melted chocolate mixture over the oat base. Use a spatula to spread it evenly, making sure the entire surface is covered with a uniform chocolate layer.
Step 6: Chill and Set
Place the pan in the refrigerator for at least one hour. The bars will firm up and become perfectly sliceable. Once chilled, cut into square pieces and enjoy your delightful treat.
Tips For No-Bake Peanut Butter Bars
Variation Ideas For No-Bake Peanut Butter Bars
Pairing Suggestions For No-Bake Peanut Butter Bars
Storage Tips For No-Bake Peanut Butter Bars
FAQs About No-Bake Peanut Butter Bars
Yes, you can substitute almond butter or cashew butter for peanut butter. Just ensure it has a similar consistency for the best results.
Make sure to press the oat mixture firmly into the pan and let it set completely in the refrigerator. This helps the bars hold together better.
They can be gluten-free if you use certified gluten-free oats. Always check the packaging to confirm.
Absolutely! These no-bake bars are kid-friendly and make a great quick snack. Just be mindful of any nut allergies.
Print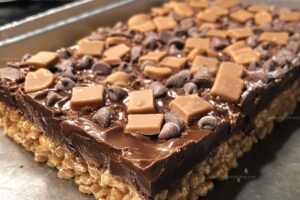
No-Bake Peanut Butter Bars Recipe
- Total Time: 1 hour 20 minutes
- Yield: 12 1x
Description
Homemade no-bake peanut butter bars melt with rich chocolate and creamy layers that promise sweet indulgence. Crisp graham cracker base and smooth peanut butter filling deliver delightful comfort you can whip up in minutes without turning on the oven.
Ingredients
Main Ingredients:
- 2 cups quick-cooking oats
- 1 cup creamy peanut butter
- 1/2 cup unsalted butter
Sweeteners:
- 1/2 cup honey
Topping:
- 1 cup semisweet chocolate chips
- 1/2 cup peanut butter (for the chocolate layer)
Instructions
- Combine peanut butter, honey, and butter in a medium saucepan, melting over medium heat until smooth and fully integrated.
- Remove from heat and thoroughly incorporate oats into the warm liquid mixture, ensuring even distribution.
- Transfer the combined mixture to a 9×9 inch pan, using a spatula or clean hands to firmly press and create an even, compact layer.
- In a separate small saucepan, gently melt chocolate chips and additional peanut butter together, stirring continuously until the mixture is completely smooth and glossy.
- Carefully pour the melted chocolate mixture over the oat base, using a spatula to spread evenly and create a uniform chocolate topping.
- Place the pan in the refrigerator and chill for 60-90 minutes, allowing the bars to set completely and develop a firm, sliceable consistency.
- Once fully chilled, remove from refrigerator and slice into square or rectangular portions using a sharp knife.
Notes
- Swap honey with maple syrup for a vegan-friendly version that keeps the same sweet, rich flavor profile.
- Use gluten-free oats to make the bars suitable for those with gluten sensitivities without compromising texture.
- Line the pan with parchment paper for easy removal and clean cutting of bars, preventing sticking and crumbling.
- Sprinkle sea salt or chopped nuts on top of the chocolate layer for added crunch and depth of flavor complexity.
- Prep Time: 10 minutes
- Cook Time: 10 minutes
- Category: Snacks, Desserts
- Method: Melting
- Cuisine: American
Nutrition
- Serving Size: 12
- Calories: 284 kcal
- Sugar: 17 g
- Sodium: 63 mg
- Fat: 20 g
- Saturated Fat: 6 g
- Unsaturated Fat: 13 g
- Trans Fat: 0 g
- Carbohydrates: 24 g
- Fiber: 3 g
- Protein: 7 g
- Cholesterol: 15 mg
Samantha Lee
Recipe Developer & Content Creator
Expertise
Plant-based and vegetarian recipes, Recipe testing and development, Food blogging and digital content creation, Culinary education and workshops
Education
Oregon Culinary Institute (Portland, OR)
Samantha sees cooking like painting, every fresh herb, every juicy tomato, a new splash of color on a canvas.
After graduating from Oregon Culinary Institute, she blended her love of global cuisines and plant-based cooking into recipes that feel fresh, fearless, and full of heart.
Samantha’s kitchen is a place where comfort food gets a modern remix and every meal feels like a little adventure. When she’s not cooking, she’s out exploring farmers’ markets, sketching new recipe ideas, or getting her hands dirty in a community garden.