The Most Flavorful Miso Ramen with Chicken Katsu Recipe
Crafting an authentic miso ramen with chicken katsu brings culinary magic right into your kitchen.
Japan’s comfort food tradition inspires this delectable fusion of flavors.
Layers of umami dance through rich broth and crispy chicken coating.
Fragrant ingredients blend seamlessly, creating a symphony of textures and tastes.
Home cooking reaches new heights with this restaurant-quality dish that feels both familiar and extraordinary.
Aromatic seasonings and carefully selected components promise a memorable meal.
Let’s transform your dinner into an unforgettable Japanese-inspired experience you’ll crave again and again.
Why Miso Ramen With Chicken Katsu Is A Flavor Explosion
What You’ll Need For Miso Ramen With Chicken Katsu
Protein Base:Noodle and Broth Components:Coating and Garnish Ingredients:Cooking Ingredients:Steps To Cook Miso Ramen With Chicken Katsu
Step 1: Boil Noodles to Perfection
Drop ramen noodles into a pot of boiling water. Cook until they reach a tender yet springy texture. Drain and set aside, letting them rest while you prepare the other components.
Step 2: Craft Mouthwatering Miso Broth
Warm chicken broth in a large pot over medium heat. Gently whisk in miso paste, stirring until it completely dissolves. The broth should develop a rich, savory aroma that hints at the deliciousness to come.
Step 3: Prepare Crispy Chicken Coating
Set up a breading station with three shallow dishes:Dredge chicken breasts first in flour, then dip in eggs, and finally coat thoroughly with panko breadcrumbs.
Step 4: Fry Chicken to Golden Perfection
Heat oil in a skillet until it shimmers. Carefully place breaded chicken into the hot oil. Fry until the exterior turns a beautiful golden brown and the inside cooks completely through. The chicken should have a crispy exterior and juicy interior.
Step 5: Assemble Ramen Masterpiece
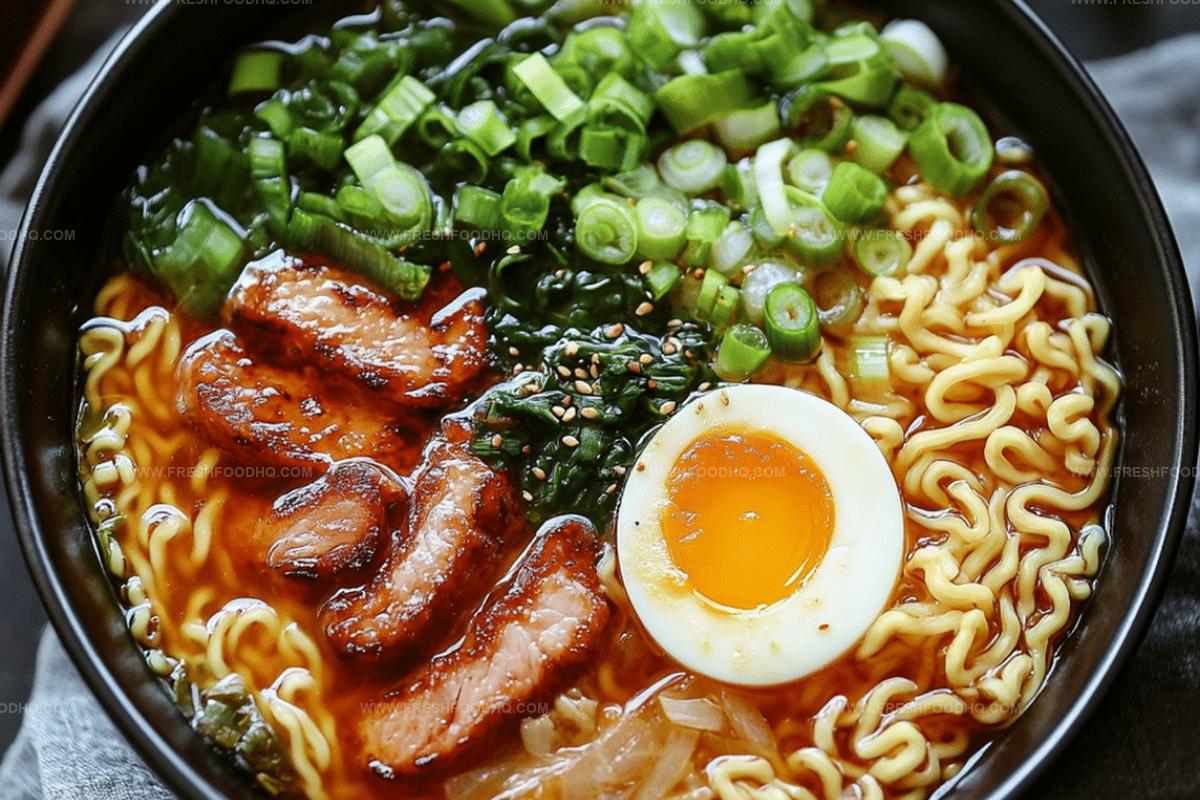
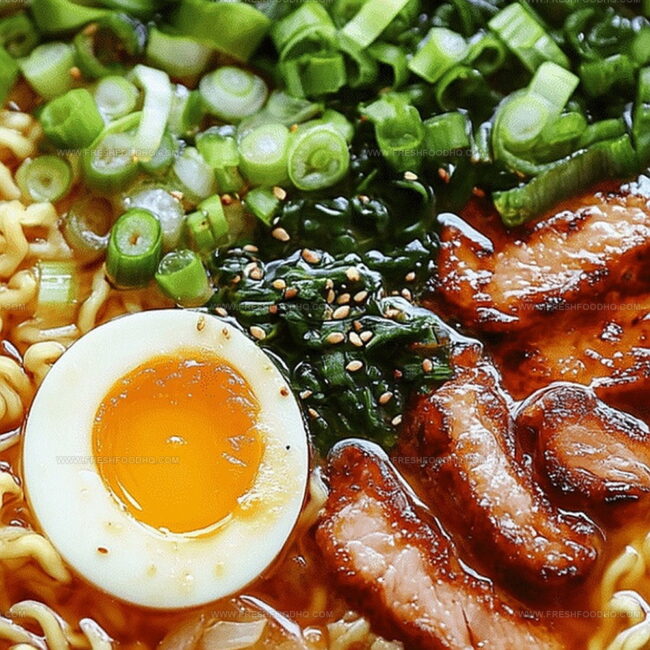
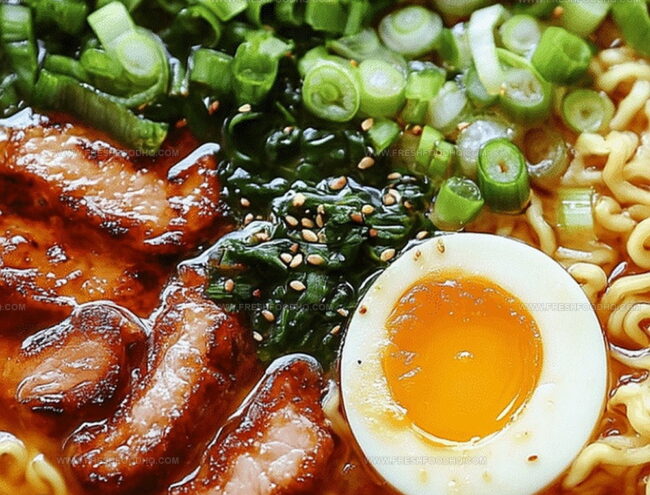
Arrange cooked noodles in serving bowls. Pour the steaming miso broth over the noodles. Top with sliced chicken katsu. Garnish with:Step 6: Serve and Savor
Present the ramen immediately while hot. Grab your chopsticks and prepare for a flavor explosion that combines Japanese comfort foods in one incredible dish.
Helpful Tips For Ramen With Chicken Katsu
Tasty Twists On Classic Miso Ramen Bowls
What To Serve With Miso Ramen And Katsu
How To Store Leftover Miso Ramen And Chicken
FAQs About Miso Ramen With Chicken Katsu
Miso paste is a traditional Japanese fermented soybean paste that adds rich, umami flavor to the broth. It provides a deep, complex taste that makes the ramen unique and authentic.
Use panko breadcrumbs and ensure the oil is hot enough (around 350°F) before frying. Pat the chicken dry before coating, and don’t overcrowd the pan to maintain crispiness.
Yes, substitute regular flour with gluten-free flour and use gluten-free panko breadcrumbs. Also, check that your miso paste is gluten-free, as some varieties contain wheat.
Print
Miso Ramen with Chicken Katsu Recipe
- Total Time: 35 minutes
- Yield: 4 1x
Description
Savory miso ramen with chicken katsu brings Japanese comfort cuisine to your kitchen, blending rich umami broth with crispy breaded chicken. Delicate noodles swimming in flavorful miso, topped with golden katsu, invite you to savor an authentic culinary journey.
Ingredients
Protein:
- 2 chicken breasts
- 2 eggs, beaten
Noodles and Base:
- 4 packs ramen noodles
- 4 cups (32 ounces/960 milliliters) chicken broth
- 1/4 cup (60 milliliters) miso paste
Coating and Garnish:
- 1 cup panko breadcrumbs
- 1/4 cup flour
- Oil for frying
- Green onions, chopped
- Nori sheets, torn into pieces
Instructions
- Immerse ramen noodles in boiling water for precisely 3-4 minutes until tender, then strain and set aside at room temperature.
- Gently heat chicken broth in a spacious saucepan over medium flame, gradually whisking miso paste until completely integrated and smooth.
- Prepare chicken coating station: dust chicken breasts with flour, dredge thoroughly in whisked eggs, then generously cover with crispy panko breadcrumbs, ensuring complete and even coverage.
- Warm vegetable oil in a heavy-bottomed skillet to 350°F, carefully placing breaded chicken and frying until exterior turns deep golden brown and internal temperature reaches 165°F, approximately 4-5 minutes per side.
- Rest fried chicken on paper towels for 2-3 minutes to absorb excess oil, then slice into elegant diagonal strips.
- Arrange cooked noodles in serving bowls, ladle aromatic miso broth over noodles, strategically place chicken katsu strips on top.
- Garnish with finely chopped green onions, delicate nori pieces, and optional sesame seeds for enhanced visual appeal and flavor complexity.
- Serve immediately while broth remains steaming hot, ensuring maximum taste and textural enjoyment.
Notes
- Crisp Coating Trick: Pat chicken breasts completely dry before breading to ensure the panko adheres perfectly and creates an extra-crunchy exterior.
- Miso Depth Enhancement: Choose darker miso paste for a richer, more complex umami flavor that elevates the broth’s overall taste profile.
- Noodle Texture Hack: Slightly undercook ramen noodles, as they’ll continue absorbing broth and soften in the hot soup, preventing mushy texture.
- Gluten-Free Adaptation: Swap regular flour and panko with gluten-free alternatives like rice flour and gluten-free breadcrumbs for celiac-friendly version.
- Prep Time: 15 minutes
- Cook Time: 20 minutes
- Category: Lunch, Dinner
- Method: Frying
- Cuisine: Japanese
Nutrition
- Serving Size: 4
- Calories: 620 kcal
- Sugar: 3 g
- Sodium: 1200 mg
- Fat: 28 g
- Saturated Fat: 6 g
- Unsaturated Fat: 20 g
- Trans Fat: 0.5 g
- Carbohydrates: 65 g
- Fiber: 4 g
- Protein: 40 g
- Cholesterol: 160 mg
Samantha Lee
Recipe Developer & Content Creator
Expertise
Plant-based and vegetarian recipes, Recipe testing and development, Food blogging and digital content creation, Culinary education and workshops
Education
Oregon Culinary Institute (Portland, OR)
Samantha sees cooking like painting, every fresh herb, every juicy tomato, a new splash of color on a canvas.
After graduating from Oregon Culinary Institute, she blended her love of global cuisines and plant-based cooking into recipes that feel fresh, fearless, and full of heart.
Samantha’s kitchen is a place where comfort food gets a modern remix and every meal feels like a little adventure. When she’s not cooking, she’s out exploring farmers’ markets, sketching new recipe ideas, or getting her hands dirty in a community garden.