Dreamy No-Bake Twix Cheesecake Recipe: A Sweet Escape
Crafting a decadent no-bake twix cheesecake brings pure dessert magic right into your kitchen.
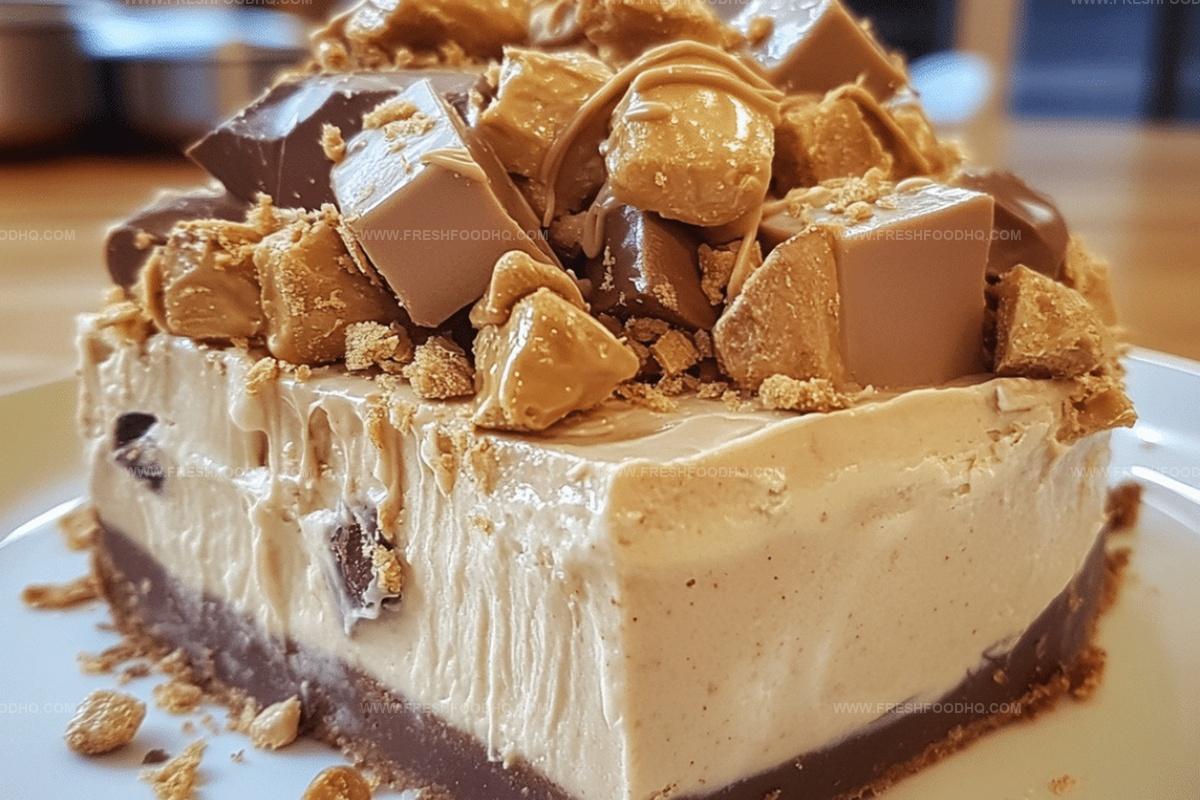
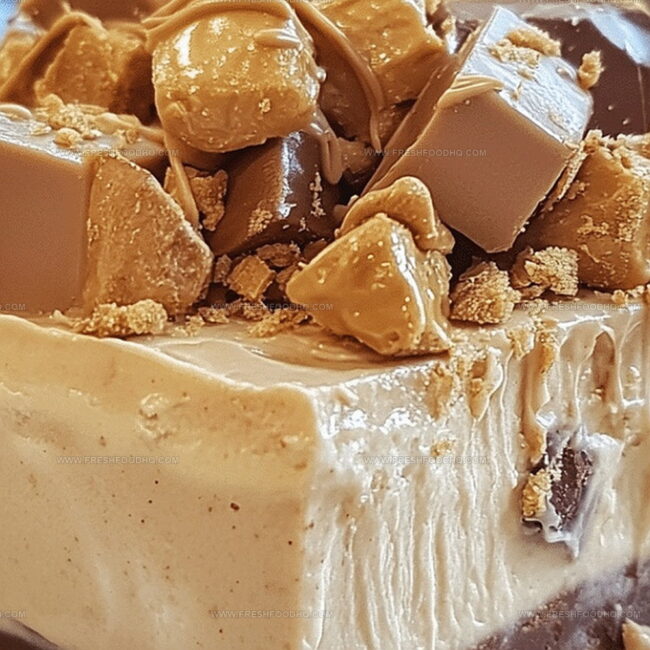
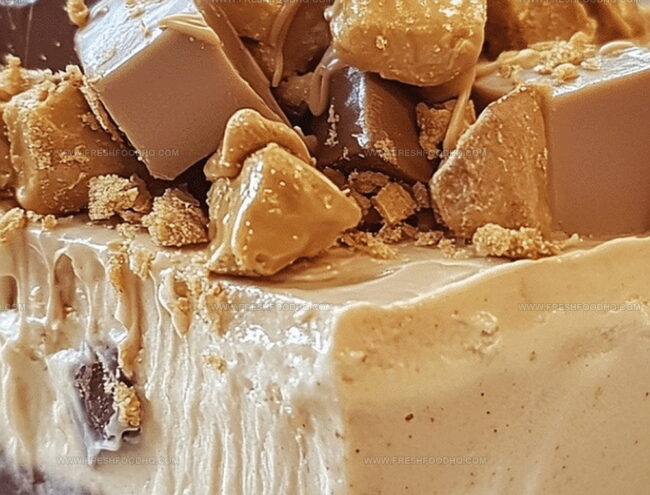
Sweet caramel layers mingle with chocolate and creamy cheese, creating an irresistible treat.
Crunchy cookie crusts provide the perfect foundation for this luxurious dessert.
Chocolate lovers will swoon over each rich, silky bite packed with classic candy bar flavors.
No oven needed means simple preparation without sacrificing incredible taste.
Cool and set this dreamy confection in your refrigerator for maximum indulgence.
Make this spectacular dessert and watch everyone’s eyes light up with pure delight.
Why Homemade No-Bake Twix Cheesecake Is A Dream Dessert
Ingredients For Homemade No-Bake Twix Cheesecake
Crust:Filling:Topping/Garnish:How To Make Homemade No-Bake Twix Cheesecake
Step 1: Crush Cookie Base
Grab chocolate sandwich cookies and pulverize them into fine crumbs using a food processor or rolling pin. Pour melted butter into the crumbs and mix thoroughly. Press the mixture firmly into the bottom of a springform pan, creating an even, compact layer that will serve as the foundation of your cheesecake.
Step 2: Whip Cream Cheese Mixture
In a large mixing bowl, combine softened cream cheese with granulated sugar and vanilla extract. Use an electric mixer to beat the ingredients until they transform into a silky, smooth consistency with no lumps. The mixture should look creamy and well-incorporated.
Step 3: Incorporate Decadent Mix-Ins
Gently fold these delightful ingredients into the cream cheese base. Use a spatula to blend them carefully, ensuring an even distribution of chocolate, caramel, and cookie pieces throughout the mixture.
Step 4: Layer And Smooth
Pour the cream cheese mixture over the prepared cookie crust. Use a spatula to spread the filling evenly, creating a smooth and level surface. Tap the pan gently to release any potential air bubbles.
Step 5: Chill And Set
Place the cheesecake in the refrigerator for a minimum of 4 hours, preferably overnight. This resting period allows the dessert to firm up and develop rich, complex flavors.
Step 6: Unveil And Serve
Remove the cheesecake from the refrigerator. Carefully release the springform pan’s sides. Slice into wedges and serve chilled. Optionally, garnish with additional chopped Twix bars or a drizzle of caramel sauce for extra indulgence.
Pro Tips For Homemade No-Bake Twix Cheesecake
Flavorful Variations For Homemade No-Bake Twix Cheesecake
Best Pairings For Homemade No-Bake Twix Cheesecake
Storage Guidelines For Homemade No-Bake Twix Cheesecake
FAQs On Homemade No-Bake Twix Cheesecake
Yes, graham crackers or digestive biscuits work great as alternatives to chocolate cookies for the base.
You can substitute with other candy bars like Snickers or Mars bars that have caramel and chocolate components.
While a springform pan makes removal easier, you can use a regular cake pan lined with parchment paper, though removing slices might be trickier.
Absolutely! This no-bake cheesecake can be prepared up to 2-3 days in advance and kept refrigerated until serving.
Print
Homemade No-Bake Twix Cheesecake Recipe
- Total Time: 4 hours 20 minutes
- Yield: 8 1x
Description
Creamy “no-bake twix cheesecake” delivers sweet caramel magic with layers of chocolate and rich cheesecake filling. Chocolate cookie crust and silky smooth texture promise delightful dessert moments you’ll savor with pure indulgence.
Ingredients
Crust:
- 2 cups (480 milliliters) chocolate cookies, crushed
- 1/2 cup (113 grams) butter, melted
Filling:
- 2 packages (16 ounces / 454 grams) cream cheese, softened
- 1/2 cup (100 grams) sugar
- 1 teaspoon vanilla extract
- 1 cup (240 milliliters) whipped cream
Topping:
- 1 cup (240 milliliters) Twix bars, chopped
Instructions
- Create a rich foundation by combining crushed chocolate cookies with melted butter, firmly pressing the mixture into the bottom of a 9-inch springform pan to establish a sturdy base.
- In a separate mixing bowl, whip cream cheese, sugar, and vanilla extract until achieving a silky, uniform consistency that is free of lumps.
- Delicately incorporate chopped Twix bars and freshly whipped cream into the cream cheese mixture, ensuring even distribution without deflating the airy texture.
- Carefully transfer the luxurious filling over the prepared chocolate cookie crust, using a spatula to create a perfectly smooth and level surface.
- Place the assembled cheesecake in the refrigerator for a minimum of 4 hours, preferably overnight, allowing the dessert to solidify and develop rich, complex flavors.
- When ready to serve, gently release the springform pan’s edges and transfer the chilled cheesecake to a serving platter, presenting a decadent dessert that showcases layers of creamy texture and chocolate-caramel notes.
Notes
- Choose cookies with high cocoa content for a richer, more intense chocolate base that complements the Twix bars.
- Ensure cream cheese is at room temperature to prevent lumps and create a smoother, silkier filling texture.
- Chop Twix bars into small, uniform pieces to distribute the caramel and chocolate evenly throughout the cheesecake.
- Chill the springform pan before pressing the crust to help it set faster and create a more stable base.
- Prep Time: 20 minutes
- Cook Time: 0 minutes
- Category: Desserts
- Method: Refrigerating
- Cuisine: American
Nutrition
- Serving Size: 8
- Calories: 477
- Sugar: 30 g
- Sodium: 238 mg
- Fat: 35 g
- Saturated Fat: 19 g
- Unsaturated Fat: 14 g
- Trans Fat: 0.5 g
- Carbohydrates: 33 g
- Fiber: 1.2 g
- Protein: 6 g
- Cholesterol: 75 mg
Samantha Lee
Recipe Developer & Content Creator
Expertise
Plant-based and vegetarian recipes, Recipe testing and development, Food blogging and digital content creation, Culinary education and workshops
Education
Oregon Culinary Institute (Portland, OR)
Samantha sees cooking like painting, every fresh herb, every juicy tomato, a new splash of color on a canvas.
After graduating from Oregon Culinary Institute, she blended her love of global cuisines and plant-based cooking into recipes that feel fresh, fearless, and full of heart.
Samantha’s kitchen is a place where comfort food gets a modern remix and every meal feels like a little adventure. When she’s not cooking, she’s out exploring farmers’ markets, sketching new recipe ideas, or getting her hands dirty in a community garden.