
The Best Homemade Fried Cheese Bites Recipe for Snack Lovers
Crispy golden homemade fried cheese bites spark joy in every kitchen adventure.
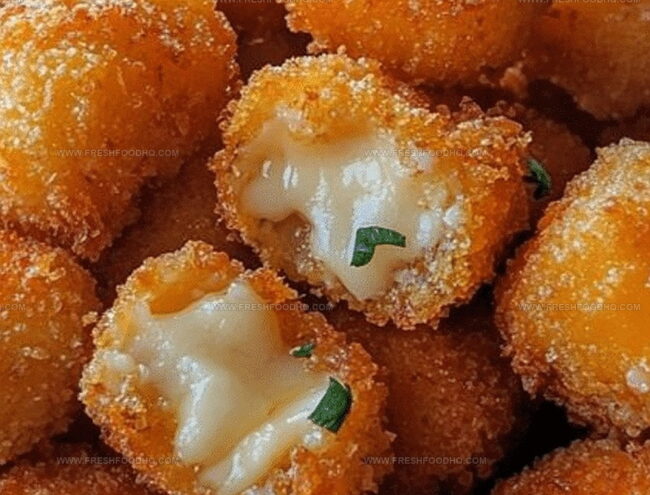
Melted centers create irresistible pockets of deliciousness that dance across taste buds.
Cheese lovers understand the magic of these perfectly crafted appetizers.
Simple ingredients come together with minimal kitchen skills required.
Crunchy exterior gives way to smooth, warm cheese that melts instantly.
Each bite promises a delectable journey through texture and flavor.
Let’s uncover this crowd-pleasing recipe that guarantees smiles around the table.
Why Homemade Fried Cheese Bites Are a Crowd Pleaser

Ingredients for Homemade Fried Cheese Bites
Main Cheese Ingredient:Coating Ingredients:Seasoning Ingredients:Frying and Serving Components:How to Prepare Homemade Fried Cheese Bites
Step 1: Chop Cheese into Bite-Sized Pieces
Transform your cheese block into delightful cubes that are perfect for popping into your mouth. Slice the cheese carefully into uniform 1-inch squares, creating little flavor bombs ready for their crispy transformation.
Step 2: Create Magical Coating Stations
Set up three exciting flavor zones in shallow bowls:Step 3: Dress Up the Cheese Cubes
Perform a delicious coating dance with each cheese cube:
First, roll the cube in flour for a light dusty layer.
Next, bathe the floured cube in beaten eggs, letting excess drip away.
Finally, roll in the seasoned breadcrumb mixture, pressing gently to create a perfect crispy armor.
Step 4: Chill and Set the Coating
Arrange the coated cheese cubes on a baking sheet. Slide them into the refrigerator for a cool 30-minute rest. This magical pause helps the coating stick like a delicious shield during frying.
Step 5: Prepare Sizzling Hot Oil
Heat vegetable or canola oil in a deep pan until it reaches a toasty 350°F. Use a cooking thermometer to ensure perfect temperature for golden, crispy goodness.
Step 6: Fry to Golden Perfection
Gently lower cheese cubes into the hot oil, working in small batches. Fry for 1-2 minutes until they transform into crispy, golden treasures. Use a slotted spoon to rescue them from the oil and drain on paper towels.
Step 7: Serve and Devour
Plate these hot, crispy cheese bites immediately. Pair with marinara sauce, ranch dressing, or your favorite dipping companion for an irresistible snack that’ll disappear in minutes!
Pro Tips for Homemade Fried Cheese Bites
Flavorful Variations of Homemade Fried Cheese Bites
Pairing Suggestions for Homemade Fried Cheese Bites
Storage Tips for Homemade Fried Cheese Bites
FAQs About Homemade Fried Cheese Bites
Mozzarella, cheddar, and pepper jack are excellent choices. They melt well and create a creamy interior while maintaining their shape during frying.
Yes, you can prepare and bread the cheese bites up to a day in advance. Keep them refrigerated on a baking sheet, covered with plastic wrap, until ready to fry.
Ensure the cheese is thoroughly coated, chilled for at least 30 minutes before frying, and the oil is at the correct temperature (350F). These steps help create a seal that prevents cheese from escaping.
Print
Homemade Fried Cheese Bites Recipe
- Total Time: 42 minutes
- Yield: 4 1x
Description
Crispy golden “Homemade Fried Cheese Bites” deliver irresistible comfort with each crunchy, melty morsel. Cheese lovers will savor these delectable morsels that promise pure indulgence in every delightful bite.
Ingredients
Main Ingredients:
- 8 ounces (226 grams) block of cheese (cheddar, mozzarella, or pepper jack)
- 2 large eggs
- 1 cup (120 grams) all-purpose flour
- 1 cup (100 grams) breadcrumbs (panko or regular)
Seasonings:
- 1/2 teaspoon garlic powder
- 1/2 teaspoon paprika
- 1/2 teaspoon salt
- 1/4 teaspoon black pepper
Cooking Ingredient:
- Oil for frying (vegetable or canola oil)
Instructions
- Transform a block of cheese into uniform cubes, ensuring each piece is roughly the same size to guarantee consistent cooking and coating.
- Establish three distinct breading zones: Scatter flour in the first vessel, whisk eggs until uniformly blended in the second, and combine breadcrumbs with aromatic seasonings in the third.
- Execute a precise coating technique by methodically enveloping each cheese morsel: First dust with flour, ensuring complete coverage; next submerge in egg wash, allowing superfluous liquid to cascade off; finally, roll through seasoned breadcrumb mixture, gently pressing to secure an even layer.
- Stabilize the coated cheese fragments by positioning them on a chilled tray, then refrigerate for approximately half an hour to solidify the protective exterior and prevent disintegration during frying.
- Prepare the frying environment by heating petroleum to precisely 350°F, utilizing a culinary thermometer to monitor temperature consistency and prevent potential burning.
- Strategically fry cheese bites in modest quantities, submerging them for 60-120 seconds until achieving a rich golden-brown exterior; extract using a perforated utensil and transfer to absorbent paper to eliminate excess grease.
- Present immediately while internal texture remains molten, accompanied by complementary dipping sauces that enhance the crispy, savory profile of the cheese bites.
Notes
- Prevent cheese from leaking by freezing cubes for 15 minutes before breading, ensuring a solid structure during frying.
- Select high-melting cheeses like cheddar, gouda, or mozzarella to maintain shape and create perfect gooey interior.
- Control oil temperature meticulously to achieve crispy golden exterior without burning coating or causing cheese to burst.
- Accommodate gluten-free diets by substituting all-purpose flour with almond or rice flour, and using gluten-free breadcrumbs.
- Prep Time: 40 minutes
- Cook Time: 2 minutes
- Category: Appetizer, Snacks
- Method: Frying
- Cuisine: American
Nutrition
- Serving Size: 4
- Calories: 414 kcal
- Sugar: 1 g
- Sodium: 642 mg
- Fat: 29 g
- Saturated Fat: 13 g
- Unsaturated Fat: 14 g
- Trans Fat: 0.5 g
- Carbohydrates: 22 g
- Fiber: 1 g
- Protein: 20 g
- Cholesterol: 110 mg
Samantha Lee
Recipe Developer & Content Creator
Expertise
Plant-based and vegetarian recipes, Recipe testing and development, Food blogging and digital content creation, Culinary education and workshops
Education
Oregon Culinary Institute (Portland, OR)
Samantha sees cooking like painting, every fresh herb, every juicy tomato, a new splash of color on a canvas.
After graduating from Oregon Culinary Institute, she blended her love of global cuisines and plant-based cooking into recipes that feel fresh, fearless, and full of heart.
Samantha’s kitchen is a place where comfort food gets a modern remix and every meal feels like a little adventure. When she’s not cooking, she’s out exploring farmers’ markets, sketching new recipe ideas, or getting her hands dirty in a community garden.