
Fluffy Homemade Angel Biscuits Recipe: Golden Breakfast Magic
Southern kitchens buzz with excitement over delectable homemade angel biscuits that practically float off the plate.
Soft and pillowy textures define these delightful treats passed down through generations.
Buttermilk creates magical moments in every single bite, promising pure comfort.
Delicate layers reveal a secret technique perfected by skilled home cooks.
Light as clouds, these biscuits bring warmth to any meal or gathering.
Each golden morsel connects you to cherished culinary traditions.
Prepare to savor a taste of pure southern hospitality.
What Makes Homemade Angel Biscuits Recipe So Fluffy and Light

Ingredients for Homemade Angel Biscuits Recipe
Leavening Agents:Dry Ingredients:Wet Ingredients:How to Make Homemade Angel Biscuits Recipe

Step 1: Activate Yeast
Pour warm water into a small bowl and sprinkle active dry yeast over the surface. Let the mixture sit for about 5-10 minutes until it becomes frothy and bubbly, indicating the yeast is alive and ready to work its magic.
Step 2: Blend Dry Ingredients
In a large mixing bowl, combine:Sift these ingredients together to ensure they are evenly distributed and free of lumps.
Step 3: Create Crumbly Texture
Add cold shortening to the dry ingredient mixture. Use a pastry cutter or your fingertips to work the shortening into the flour until the mixture resembles coarse, pea-sized crumbs.
Step 4: Combine Wet Ingredients
Pour buttermilk and the activated yeast mixture into the dry ingredients. Stir gently with a wooden spoon or spatula until the dough starts to come together.
Step 5: Develop Dough
Knead the mixture briefly on a lightly floured surface until it forms a soft, cohesive dough. Be careful not to overwork the dough, as this can make the biscuits tough.
Step 6: Chill Overnight
Transfer the dough to a covered container and refrigerate overnight. This resting period allows the flavors to develop and makes the dough easier to handle.
Step 7: Prepare Biscuits
Remove the dough from the refrigerator. On a floured surface, roll out the dough to about 1/2-inch thickness. Use a round biscuit cutter to cut out biscuits, pressing straight down without twisting.
Step 8: Bake to Golden Perfection
Preheat the oven to 400°F. Place the cut biscuits on a baking sheet lined with parchment paper. Bake for 10-12 minutes, or until the tops are golden brown and the edges are crisp.
Tips for Perfect Homemade Angel Biscuits Recipe
Variations for Homemade Angel Biscuits Recipe
Suggested Pairings for Homemade Angel Biscuits Recipe
How to Store Homemade Angel Biscuits Recipe
FAQs About Homemade Angel Biscuits Recipe
Angel biscuits use both yeast and chemical leaveners like baking powder, giving them a unique light, fluffy texture that combines characteristics of both yeast rolls and traditional biscuits.
Yes, the dough can be prepared and refrigerated overnight, which actually helps develop better flavor and makes the biscuits more tender.
You’ll just need basic baking tools like a large mixing bowl, biscuit cutter (or a clean drinking glass), and a baking sheet to successfully make these angel biscuits.
Print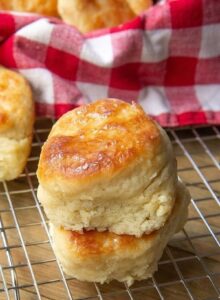
Homemade Angel Biscuits Recipe
- Total Time: Approximately 8 hours 25-27 minutes
- Yield: 12 1x
Description
Fluffy homemade angel biscuits deliver Southern comfort straight from grandma’s kitchen. Pillowy layers of buttery goodness melt in your mouth, promising a delightful companion to any meal you serve.
Ingredients
Flour and Dry Ingredients:
- 4 cups all-purpose flour
- 3 teaspoons baking powder
- 1 teaspoon baking soda
- 1 teaspoon salt
- 1/4 cup sugar
Leavening Agents:
- 1 package dry yeast
- 2 tablespoons warm water
Wet and Fat Ingredients:
- 1 cup shortening
- 2 cups buttermilk
Instructions
- Activate the yeast by combining it with warm water, allowing it to bloom and become frothy.
- Sift together flour, baking soda, salt, and baking powder in a spacious mixing bowl, ensuring even distribution of dry ingredients.
- Incorporate shortening into the flour mixture using a pastry cutter or your fingertips until the texture resembles coarse crumbs.
- Pour in buttermilk and the activated yeast mixture, gently stirring until a soft, cohesive dough forms.
- Knead the dough minimally to prevent toughness, just until ingredients are well integrated.
- Cover the dough and refrigerate overnight to develop flavor and improve texture.
- Remove dough from refrigerator and let it rest at room temperature for 15 minutes.
- Dust work surface generously with flour and roll out the chilled dough to approximately 1/2-inch thickness.
- Use a round biscuit cutter to punch out uniform circular shapes, avoiding twisting the cutter to ensure clean edges.
- Arrange biscuits on a parchment-lined baking sheet, allowing slight spacing between each.
- Preheat oven to 400°F and bake for 12-14 minutes until tops turn golden and edges are crisp.
- Transfer biscuits to a wire rack and serve warm for optimal flavor and texture.
Notes
- Keep yeast water temperature around 110-115°F to activate without killing the yeast, ensuring proper rising and texture.
- Chill dough overnight allows gluten to relax, creating more tender and flakier biscuits with enhanced flavor development.
- Use cold shortening and work quickly when cutting it into dry ingredients to maintain small, pea-sized pieces that create light, airy layers.
- For gluten-free version, substitute all-purpose flour with a high-quality gluten-free blend and add xanthan gum for better binding and structure.
- Prep Time: Overnight refrigeration (8 hours) + about 15 minutes active prep
- Cook Time: 10-12 minutes
- Category: Breakfast, Lunch, Dinner, Snacks
- Method: Baking
- Cuisine: American
Nutrition
- Serving Size: 12
- Calories: 243 kcal
- Sugar: 5 g
- Sodium: 367 mg
- Fat: 10 g
- Saturated Fat: 4 g
- Unsaturated Fat: 6 g
- Trans Fat: 0.1 g
- Carbohydrates: 33 g
- Fiber: 1 g
- Protein: 4 g
- Cholesterol: 17 mg
Samantha Lee
Recipe Developer & Content Creator
Expertise
Plant-based and vegetarian recipes, Recipe testing and development, Food blogging and digital content creation, Culinary education and workshops
Education
Oregon Culinary Institute (Portland, OR)
Samantha sees cooking like painting, every fresh herb, every juicy tomato, a new splash of color on a canvas.
After graduating from Oregon Culinary Institute, she blended her love of global cuisines and plant-based cooking into recipes that feel fresh, fearless, and full of heart.
Samantha’s kitchen is a place where comfort food gets a modern remix and every meal feels like a little adventure. When she’s not cooking, she’s out exploring farmers’ markets, sketching new recipe ideas, or getting her hands dirty in a community garden.