The Perfect Hibachi Fried Rice Recipe for Homemade Magic
Crafting a mouthwatering hibachi fried rice can transport you straight to a sizzling Japanese grill.
Aromatic sesame oil and perfectly scrambled eggs dance alongside crisp vegetables in this irresistible dish.
Skilled chefs have long celebrated the art of creating restaurant-quality meals at home.
Restaurant-style magic happens when simple ingredients combine with precise cooking techniques.
Professional tricks turn ordinary ingredients into an extraordinary culinary experience.
Woks heated to high temperatures create that signature smoky flavor you crave.
Each bite promises a delightful journey through textures and tastes that will make your taste buds cheer.
Why Hibachi Fried Rice Is Always A Win
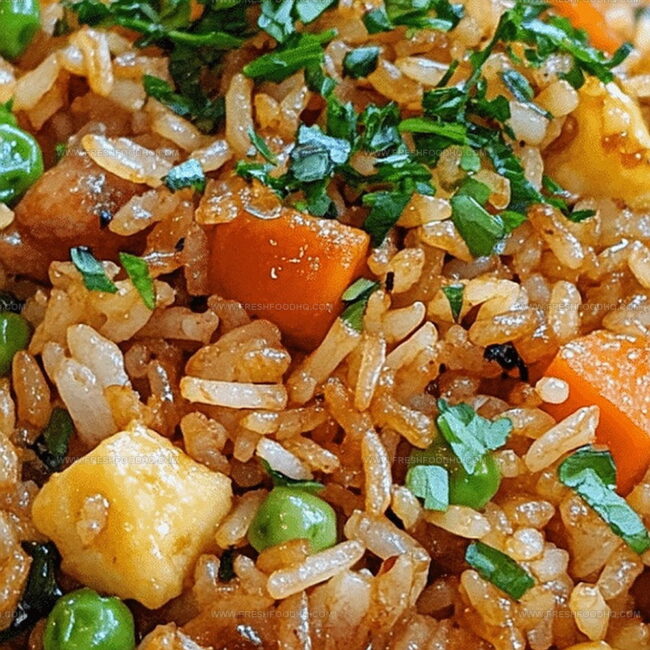
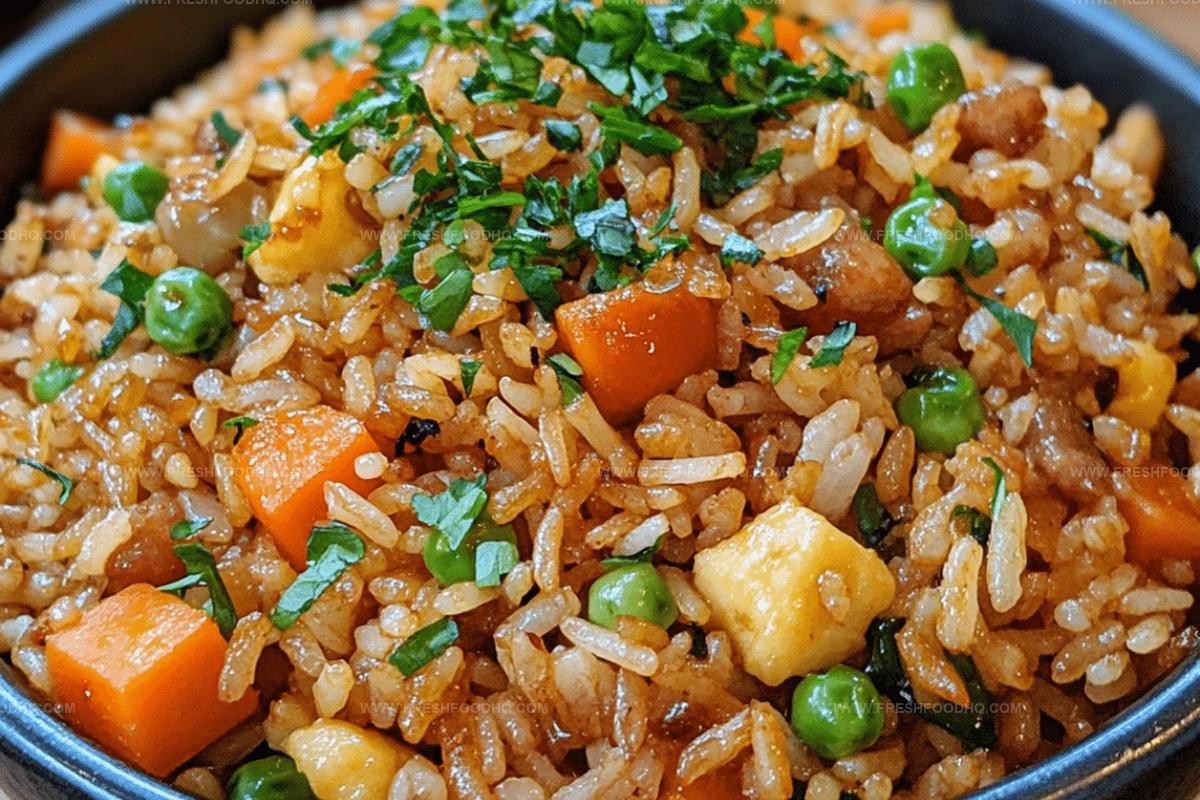
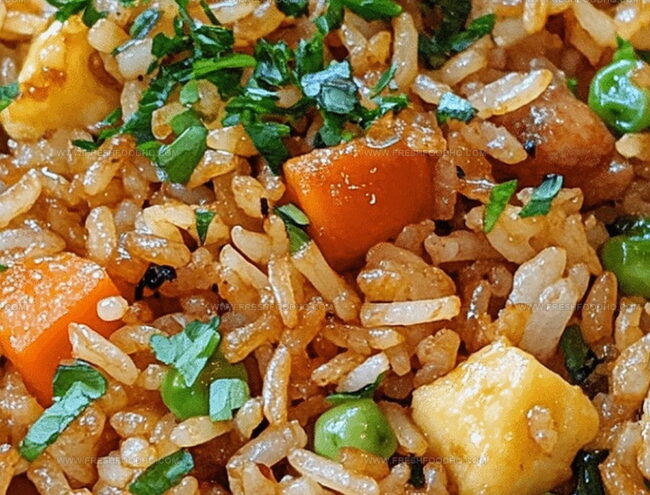
What Goes Into Hibachi Fried Rice
Main Ingredients:Vegetables:Seasoning and Flavor Enhancers:Optional Protein:Garnish:How To Cook Hibachi Fried Rice The Easy Way
Step 1: Prepare the Skillet
Heat up a large skillet or wok over medium-high heat. Drizzle in vegetable or sesame oil to create a sizzling cooking surface.
Step 2: Sauté Colorful Vegetables
Toss in diced onions, carrots, and peas. Cook and stir for 3-4 minutes until the vegetables start to soften and release their aromatic flavors.
Step 3: Create Fluffy Scrambled Eggs
Move the vegetables to one side of the skillet. Pour beaten eggs into the empty space. Scramble the eggs until they’re fully cooked and golden. Mix the scrambled eggs with the sautéed vegetables.
Step 4: Boost the Flavor Profile
Add minced garlic and cook for 30 seconds until the kitchen fills with a fragrant aroma.
Step 5: Transform the Rice
Introduce day-old cooked rice to the skillet. Break up any stubborn clumps and stir-fry for 3-4 minutes. Ensure the rice gets evenly coated with oil and thoroughly mixed with the vegetable-egg combination.
Step 6: Season the Fried Rice
Enhance the dish with:Continue cooking and stirring for 2 minutes to blend the flavors completely.
Step 7: Add Protein Power
Optional protein options:Heat the protein thoroughly within the rice mixture.
Step 8: Final Touch and Serve
Sprinkle sliced green onions on top. Serve the hibachi fried rice immediately while hot and steaming.
Top Tricks For Better Hibachi Fried Rice
Tasty Spins To Try With Hibachi Fried Rice
What To Serve With Hibachi Fried Rice Tonight
How To Store Hibachi Fried Rice The Smart Way
Hibachi Fried Rice Questions Answered Clearly
Day-old rice is drier and less sticky, which helps prevent clumping and ensures each grain of rice gets crispy and evenly coated with sauce during stir-frying.
Fresh rice contains more moisture and can make the fried rice mushy, so it’s best to use cold, day-old rice that has been refrigerated for at least a few hours.
Long-grain white rice like jasmine or basmati works best because they have less starch and separate easily during stir-frying, creating a light and fluffy texture.
Print
Hibachi Fried Rice Recipe
- Total Time: 17-18 minutes
- Yield: 4 1x
Description
Sizzling Hibachi Fried Rice delights palates with authentic Japanese-inspired flavors and quick-cooking techniques. Crispy rice, savory vegetables, and umami-rich seasonings create a restaurant-quality meal you can easily master in your own kitchen.
Ingredients
Main Ingredients:
- 3 cups white rice (cooked, preferably day-old)
- 2 eggs, lightly beaten
- 1/2 cup diced onion
- 1/2 cup diced carrots
- 1/2 cup frozen peas (thawed)
Protein and Seasoning Ingredients:
- 23 cloves garlic, minced
- 3 tablespoons soy sauce
- 1 tablespoon oyster sauce
- 1 tablespoon sesame oil
- 1/4 teaspoon ground black pepper
Cooking and Garnish Ingredients:
- 2 tablespoons vegetable oil
- 2 green onions, sliced
- Optional: cooked shrimp, chicken, or steak
Instructions
- Preheat a large skillet or wok to medium-high heat, coating the surface with vegetable or sesame oil.
- Toss diced onions, carrots, and peas into the hot pan, sautéing for 3-4 minutes until vegetables soften and become slightly translucent.
- Create a separate space in the skillet and pour beaten eggs, scrambling thoroughly until fully cooked, then gently integrate with the vegetable mixture.
- Introduce minced garlic to the pan, stirring rapidly for 30 seconds to release aromatic flavors.
- Incorporate day-old rice into the skillet, carefully breaking apart any dense clusters and ensuring each grain becomes evenly coated with oil and thoroughly mixed with vegetables and eggs.
- Drizzle soy sauce, oyster sauce, sesame oil, and sprinkle black pepper across the rice, stirring consistently for an additional 2 minutes to distribute seasonings uniformly.
- Optional: Fold in pre-cooked protein such as shrimp, chicken, or steak, heating until the protein reaches a warm temperature throughout the dish.
- Finish by sprinkling freshly sliced green onions across the surface and serve immediately while piping hot.
Notes
- Opt for day-old rice to prevent soggy texture and ensure each grain separates perfectly during stir-frying.
- Use high heat and a wide skillet or wok to create authentic hibachi-style crispy rice with slightly charred edges.
- Customize protein options like tofu for vegetarian diets or swap soy sauce with tamari for gluten-free needs.
- Enhance flavor by adding a small drizzle of chili oil or sriracha for those who enjoy extra heat and complexity.
- Prep Time: 5 minutes
- Cook Time: 12-13 minutes
- Category: Lunch, Dinner, Snacks
- Method: Sautéing
- Cuisine: Japanese
Nutrition
- Serving Size: 4
- Calories: 238 kcal
- Sugar: 2 g
- Sodium: 650 mg
- Fat: 11 g
- Saturated Fat: 2 g
- Unsaturated Fat: 9 g
- Trans Fat: 0 g
- Carbohydrates: 28 g
- Fiber: 2 g
- Protein: 7 g
- Cholesterol: 93 mg
Samantha Lee
Recipe Developer & Content Creator
Expertise
Plant-based and vegetarian recipes, Recipe testing and development, Food blogging and digital content creation, Culinary education and workshops
Education
Oregon Culinary Institute (Portland, OR)
Samantha sees cooking like painting, every fresh herb, every juicy tomato, a new splash of color on a canvas.
After graduating from Oregon Culinary Institute, she blended her love of global cuisines and plant-based cooking into recipes that feel fresh, fearless, and full of heart.
Samantha’s kitchen is a place where comfort food gets a modern remix and every meal feels like a little adventure. When she’s not cooking, she’s out exploring farmers’ markets, sketching new recipe ideas, or getting her hands dirty in a community garden.