Crispy Spring Rolls Recipe: Fresh, Golden Bites of Joy
Crafting delightful crispy spring rolls brings pure culinary joy to your kitchen adventure.
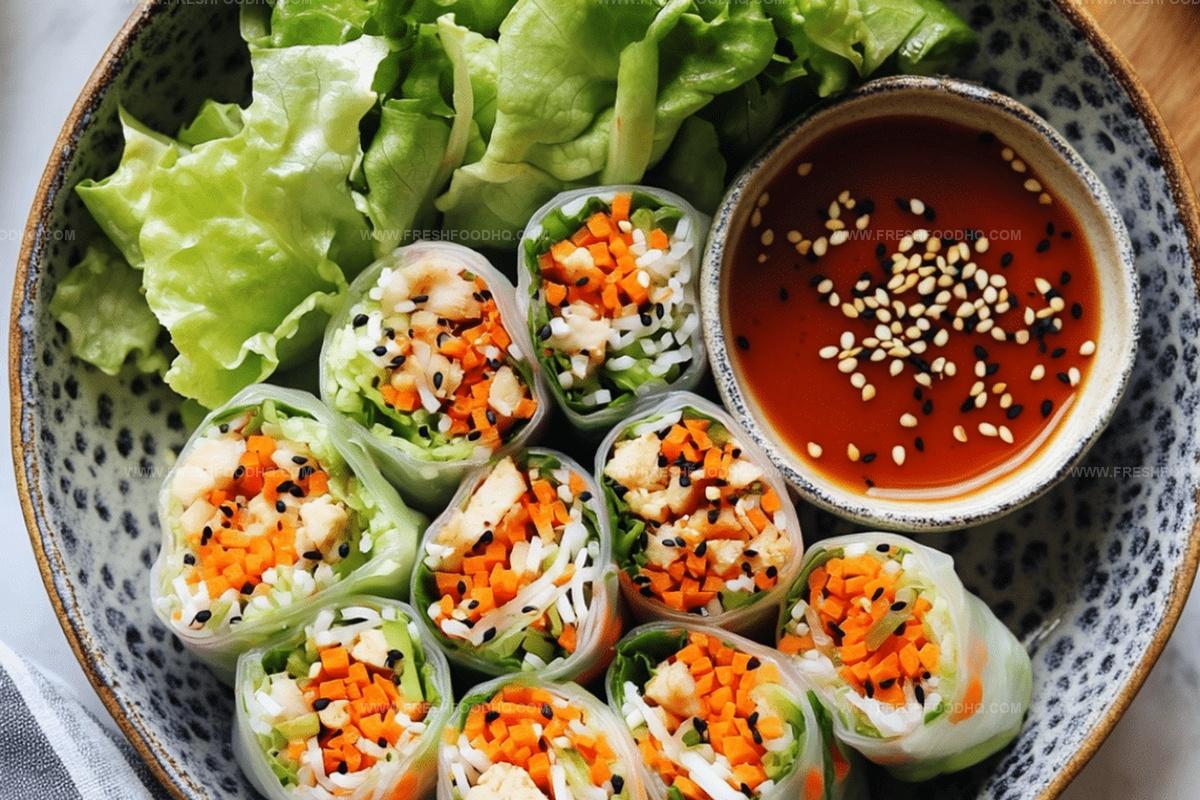
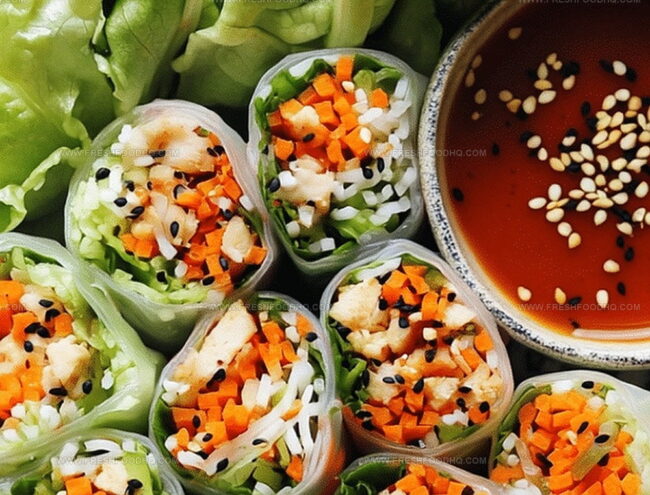
Small golden parcels packed with vibrant vegetables and savory fillings promise an exciting meal.
Wrapped in delicate rice paper, these delectable rolls burst with fresh flavors and crisp textures.
Each bite transports you to bustling street markets across southeast asia.
Crisp edges and tender interiors create a perfect balance of crunch and softness.
Seasonal ingredients make these rolls adaptable to whatever fresh produce you have on hand.
Master this simple technique, and you’ll become the star of any gathering.
Invite friends, roll up your sleeves, and let the cooking magic begin.
Why These Spring Rolls Stay Crispy Every Time

Spring Roll Ingredients You’ll Want Handy
Main Ingredients:Aromatics and Seasonings:Cooking and Serving Ingredients:How to Wrap and Fry Spring Rolls Perfectly
Step 1: Sizzle the Vegetable Medley
Create a flavor-packed filling by heating oil in a large skillet. Toss in minced garlic and let it dance until aromatic. Add the following ingredients:Stir-fry the mixture for 5-7 minutes until vegetables reach a perfect tender-crisp texture. Splash in soy sauce, sesame oil, salt, and pepper for an extra flavor punch. Let the filling cool down slightly to prevent soggy wrappers.
Step 2: Wrap with Precision
Lay out a spring roll wrapper on a clean surface. Position a generous spoonful of filling near the bottom corner. Fold the bottom corner over the filling, tuck in the sides, and roll tightly toward the top corner. Use a tiny bit of water to seal the edge securely. Continue this process until all wrappers are filled.
Step 3: Transform into Golden Delights
Heat oil in a deep pan or fryer until it reaches 350 degrees Fahrenheit. Carefully lower spring rolls into the hot oil, working in batches. Gently turn them to ensure even browning. Fry until they turn a gorgeous golden brown and become wonderfully crispy (about 2-3 minutes). Transfer to paper towels to drain excess oil.
Step 4: Serve and Savor
Plate the spring rolls while they’re piping hot. Accompany with sweet chili sauce, classic soy sauce, or your favorite dipping companion. These crispy parcels of joy are guaranteed to be the star of any gathering, bringing a burst of flavor and crunch to the table.
Top Tricks for Crispy, Golden Spring Rolls
Fun Fillings to Switch Up Your Spring Rolls
What to Dip or Serve With Spring Rolls
Store Spring Rolls Without Losing the Crunch
Spring Roll Questions? Here’s the FAQ Roundup
Yes, you can customize the filling with vegetables like mushrooms, green onions, or even leftover cooked chicken or shrimp for added variety.
Ensure the filling is not too wet, drain excess moisture from vegetables, and make sure oil is hot enough before frying to create a crispy exterior.
Work gently and keep wrappers at room temperature. If a wrapper tears, use a second wrapper as a backup or patch the tear with a small piece of wrapper.
Print
Crispy Spring Rolls Recipe
- Total Time: 25 minutes
- Yield: 10–12 1x
Description
Crispy Vietnamese Spring Rolls deliver a perfect harmony of crunchy textures and delicate flavors that dance across your palate. Packed with fresh herbs and savory filling, you’ll discover a delightful culinary journey through traditional Vietnamese street food that satisfies every craving.
Ingredients
Protein:
- 1 cup cooked shrimp, chicken, or tofu
Vegetables:
- 1 cup shredded cabbage
- 1 cup carrots, julienned
- 1 bell pepper, thinly sliced
- 1/2 cup bean sprouts
- 2 green onions, finely chopped
- 2 cloves garlic, minced
Seasonings and Wrappers:
- 1 tablespoon soy sauce
- 1 teaspoon sesame oil
- Salt to taste
- Pepper to taste
- 1 package spring roll wrappers (about 10-12)
- Vegetable oil or peanut oil for frying
Instructions
- Sauté aromatics and vegetables in a skillet over medium heat until they release their fragrant essence and become tender, approximately 5-7 minutes.
- Incorporate seasoning elements like soy sauce, sesame oil, salt, and pepper into the vegetable mixture, then allow the filling to cool and develop its complex flavor profile.
- Prepare the spring roll wrappers by positioning them diagonally on a clean surface, creating a diamond shape with the point facing toward you.
- Carefully distribute the cooled vegetable filling near the bottom corner of the wrapper, ensuring an even and moderate portion.
- Fold the bottom corner precisely over the filling, then gently fold the side edges inward to create a compact envelope.
- Roll the wrapper tightly toward the top corner, using a small amount of water to seal the final edge and prevent unraveling during cooking.
- Heat cooking oil in a deep pan to 350F, creating a consistent and hot frying environment for optimal crispiness.
- Carefully lower the prepared spring rolls into the hot oil, rotating them periodically to achieve an even, golden-brown exterior.
- Transfer the fried spring rolls to paper towels, allowing excess oil to drain and maintaining their crisp texture.
- Present the spring rolls immediately with complementary dipping sauces like sweet chili or traditional soy sauce, creating an appetizing and interactive dining experience.
Notes
- Customize the filling by swapping proteins like tofu, shrimp, or chicken for a personalized touch.
- Keep the filling dry to prevent soggy wrappers and ensure maximum crispiness during frying.
- Prevent wrapper edges from separating by using water or egg wash as a natural glue.
- Maintain consistent oil temperature around 350F to achieve perfectly golden, crisp exterior without greasy results.
- Prep Time: 15 minutes
- Cook Time: 10 minutes
- Category: Appetizer, Snacks
- Method: Frying
- Cuisine: Chinese
Nutrition
- Serving Size: 45942
- Calories: 3 kcal
- Sugar: 0.2 g
- Sodium: 23 mg
- Fat: 0.1 g
- Saturated Fat: 0 g
- Unsaturated Fat: 0.1 g
- Trans Fat: 0 g
- Carbohydrates: 0.6 g
- Fiber: 0.2 g
- Protein: 0.3 g
- Cholesterol: 1 mg
Samantha Lee
Recipe Developer & Content Creator
Expertise
Plant-based and vegetarian recipes, Recipe testing and development, Food blogging and digital content creation, Culinary education and workshops
Education
Oregon Culinary Institute (Portland, OR)
Samantha sees cooking like painting, every fresh herb, every juicy tomato, a new splash of color on a canvas.
After graduating from Oregon Culinary Institute, she blended her love of global cuisines and plant-based cooking into recipes that feel fresh, fearless, and full of heart.
Samantha’s kitchen is a place where comfort food gets a modern remix and every meal feels like a little adventure. When she’s not cooking, she’s out exploring farmers’ markets, sketching new recipe ideas, or getting her hands dirty in a community garden.