
Jolly Christmas Red Velvet Poke Cake Recipe for Holiday Magic
Sweet memories swirl around this delightful christmas red velvet poke cake that brings festive cheer to any gathering.
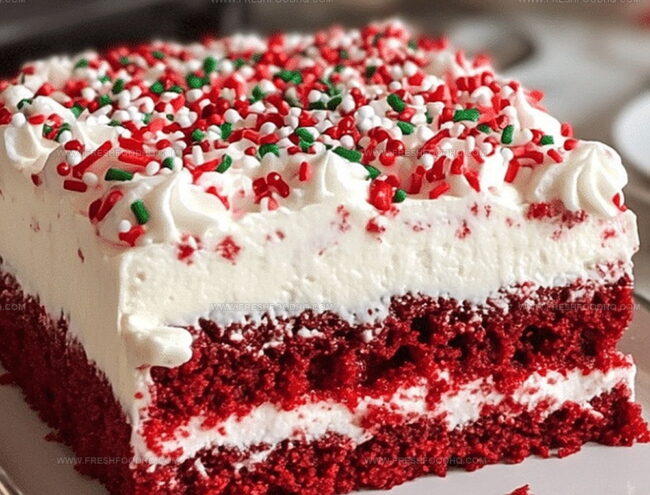
Layers of crimson cake promise a delectable experience for everyone at the table.
Velvety textures peek through holes filled with creamy goodness, creating a dessert that looks as stunning as it tastes.
Soft cream cheese frosting adds a luxurious touch to each decadent slice.
Holiday magic comes alive with this simple yet impressive treat that sparks joy and conversation.
Guests will beg you to share the secret behind this showstopping dessert.
You cannot resist diving into this merry confection that celebrates the season’s warmth and sweetness.
Why You’ll Love Christmas Red Velvet Poke Cake

Ingredients For Christmas Red Velvet Poke Cake
Cake Base:Moisture and Filling:Topping and Decoration:How To Make Christmas Red Velvet Poke Cake
Step 1: Whip Up the Festive Base
Grab your red velvet cake mix and follow the package directions. Bake the cake in a 9×13 inch pan, creating a vibrant holiday canvas that’ll make everyone’s eyes sparkle.
Step 2: Create Delightful Cake Holes
Take a wooden spoon handle and playfully poke holes all across the warm cake. These little tunnels will be magical pathways for delicious flavors.
Step 3: Drench in Sweet Milk Magic
Gently pour sweetened condensed milk over the cake. Watch as the liquid seeps into every hole, transforming the cake into a decadent treat.
Step 4: Chill and Let Flavors Mingle
Allow the cake to cool completely at room temperature. This resting period lets all the yummy ingredients get to know each other.
Step 5: Spread Marshmallow Cloud Layer
Carefully spread a luxurious layer of marshmallow creme across the cake. Create a smooth, fluffy blanket that adds dreamy sweetness.
Step 6: Crown with Festive Topping
Cover the marshmallow layer with whipped topping. Sprinkle red and green festive sprinkles, turning your cake into a holiday masterpiece.
Step 7: Refrigerate for Ultimate Deliciousness
Tuck the cake into the refrigerator for at least 2 hours. This chilling time lets all the flavors harmonize and the texture become perfectly divine.
Helpful Tips For Christmas Red Velvet Poke Cake
Fun Flavors For Christmas Red Velvet Poke Cake
Perfect Pairings For Christmas Red Velvet Poke Cake
How To Store Christmas Red Velvet Poke Cake
Christmas Red Velvet Poke Cake FAQs
This poke cake technique allows sweetened condensed milk to seep into the cake, creating extra moisture and rich flavor throughout every slice.
Yes, this cake actually tastes better when prepared a day in advance, as it gives time for the flavors to blend and the cake to absorb the condensed milk completely.
Absolutely! The red and green sprinkles make it perfect for Christmas parties, and it’s an easy dessert that serves a crowd with minimal effort.
No, this recipe is beginner-friendly. It uses a cake mix as the base and requires simple steps like poking holes and adding toppings, making it perfect for novice bakers.
Print
Christmas Red Velvet Poke Cake Recipe
- Total Time: 2 hours 50 minutes – 2 hours 55 minutes
- Yield: 12 1x
Description
Red Velvet Christmas Poke Cake delivers festive cheer with its rich crimson layers and creamy white frosting. Indulgent holiday dessert promises merry bites of classic southern charm that sparkle with seasonal spirit.
Ingredients
Cake Base:
- 1 box red velvet cake mix
Liquid Ingredients:
- 1 cup milk
- 1 can (14 ounces / 397 grams) sweetened condensed milk
Topping and Garnish:
- 1 jar (7 ounces / 198 grams) marshmallow creme
- 1 container (8 ounces / 226 grams) whipped topping
- Red sprinkles
- Green sprinkles
Instructions
- Craft the red velvet cake according to package guidelines, utilizing a 9×13 inch baking vessel and adhering to precise baking temperatures.
- Once the cake emerges from the oven, meticulously puncture uniform holes across the entire surface using a wooden spoon handle.
- Gently cascade sweetened condensed milk over the cake, ensuring each strategically created hole becomes saturated with creamy liquid.
- Allow the cake to descend to room temperature, permitting complete absorption of the milk into the delicate crumb.
- Apply a luxurious, smooth layer of marshmallow creme, spreading evenly to create a pillowy foundation.
- Crown the cake with billowy whipped topping, creating elegant peaks and valleys across the surface.
- Artfully scatter vibrant red and green festive sprinkles, transforming the dessert into a holiday masterpiece.
- Nestle the cake into the refrigerator for a minimum of two hours, allowing flavors to harmonize and texture to solidify into a decadent treat.
Notes
- Enhance cake moisture by slowly pouring condensed milk, allowing it to seep deeply into each hole for maximum flavor absorption.
- Prevent dense texture by gently folding cake mix ingredients and avoiding overmixing, which can create tough cake layers.
- Create gluten-free version by substituting regular cake mix with certified gluten-free red velvet mix and checking ingredient compatibility.
- Elevate presentation by using festive holiday-themed sprinkles or edible metallic decorations for extra visual appeal and seasonal charm.
- Prep Time: 15 minutes
- Cook Time: 30-35 minutes
- Category: Desserts
- Method: Baking
- Cuisine: American
Nutrition
- Serving Size: 12
- Calories: 350 kcal
- Sugar: 38 g
- Sodium: 280 mg
- Fat: 12 g
- Saturated Fat: 7 g
- Unsaturated Fat: 4 g
- Trans Fat: 0.5 g
- Carbohydrates: 54 g
- Fiber: 1 g
- Protein: 3 g
- Cholesterol: 30 mg
Samantha Lee
Recipe Developer & Content Creator
Expertise
Plant-based and vegetarian recipes, Recipe testing and development, Food blogging and digital content creation, Culinary education and workshops
Education
Oregon Culinary Institute (Portland, OR)
Samantha sees cooking like painting, every fresh herb, every juicy tomato, a new splash of color on a canvas.
After graduating from Oregon Culinary Institute, she blended her love of global cuisines and plant-based cooking into recipes that feel fresh, fearless, and full of heart.
Samantha’s kitchen is a place where comfort food gets a modern remix and every meal feels like a little adventure. When she’s not cooking, she’s out exploring farmers’ markets, sketching new recipe ideas, or getting her hands dirty in a community garden.