
Irresistibly Fluffy Chocolate Meringue Pie Recipe
Dreamy chocolate meringue pie brings pure decadence to your dessert table with layers of silky smoothness.
Rich cocoa flavors dance through each delicate slice, promising an unforgettable experience.
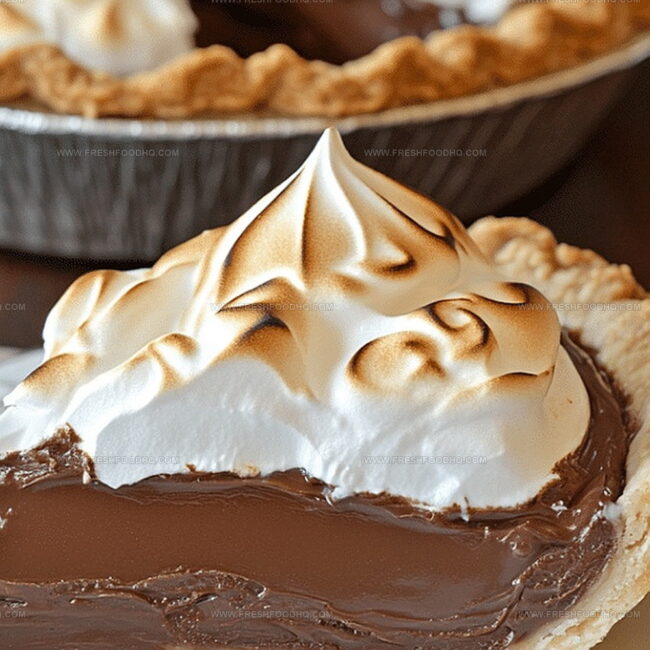
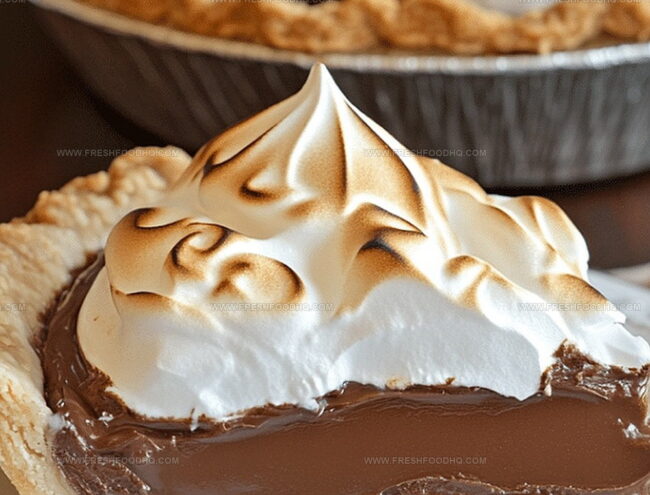
Fluffy meringue peaks crown this classic treat, creating visual drama and textural magic.
Bakers passionate about indulgent sweets will adore this recipe’s balance of creamy chocolate and cloud-like topping.
Our carefully crafted method ensures success even for novice pastry enthusiasts.
Whisking egg whites to glossy perfection might seem intimidating, but we break down each step with clarity.
Prepare to wow everyone at the table with this irresistible chocolate masterpiece that turns ordinary moments into celebrations.
Why This Pie Is Chocolate Heaven on a Plate
Ingredients That Make Chocolate Meringue Shine
Pie Base:Filling Ingredients:Meringue Topping:How to Nail That Fluffy Meringue Finish
Step 1: Whip Up Chocolate Filling
Gather your ingredients and start by blending sugar, flour, and cocoa powder in a spacious mixing bowl. Slowly incorporate heavy cream, whole milk, vanilla extract, and egg yolks, whisking until the mixture transforms into a silky-smooth consistency. Transfer the luscious chocolate blend into a saucepan and cook over medium-high heat, continuously stirring to prevent scorching. Watch as the filling gradually thickens into a rich, velvety texture. Remove from heat and distribute the filling evenly between two pre-baked deep-dish pie crusts.
Step 2: Craft Fluffy Meringue Topping
In a pristine mixing bowl, combine egg whites, sugar, and corn syrup. Whip the ingredients on high speed, transforming them into a cloud-like mixture with stiff, glossy peaks that stand tall and proud.
Step 3: Assemble and Transform
Generously spoon the billowy meringue over the chocolate-filled pies, carefully spreading it to completely seal the edges. This creates a beautiful, dramatic presentation that will impress anyone who sees it.
Step 4: Bake to Golden Perfection
Place the pies in a preheated oven at 425°F (220°C). Bake for 5-7 minutes, watching as the meringue turns a gorgeous golden-brown color with delicate toasted tips.
Step 5: Cool and Serve
Allow the pies to rest on a wire rack for at least one hour. This cooling period helps the filling set and ensures clean, beautiful slices when serving. Slice, serve, and enjoy the decadent chocolate and meringue masterpiece you’ve created!
Best Tips for a Beautiful Chocolate Pie
Flavor Up This Pie With Simple Swaps
Sips and Bites That Pair With Chocolate Pie
Store and Slice Chocolate Pie Like a Pro
FAQs for Every Chocolate Pie Lover
The combination of heavy cream, whole milk, and egg yolks creates a rich, velvety texture when whisked and cooked carefully, ensuring a smooth chocolate filling.
The filling is ready when it coats the back of a spoon and leaves a clear path when you run your finger through it, typically taking about 5-7 minutes of constant whisking.
Stiff peaks create a stable, fluffy meringue that holds its shape when piped onto the pie and provides a beautiful golden-brown topping when baked.
Print
Chocolate Meringue Pie Recipe
- Total Time: 1 hour 27 minutes
- Yield: 8 1x
Description
Indulgent chocolate meringue pie brings classic Southern comfort to dessert tables with its silky chocolate filling and cloud-like meringue topping. Creamy chocolate and airy meringue create a delightful harmony you’ll savor down to the last crumbly bite.
Ingredients
Main Ingredients:
- 4 cups whole milk
- 3 cups sugar
- 1 cup heavy cream
- 8 egg yolks
- 8 egg whites
Dry Ingredients:
- 1/2 cup flour
- 8 heaping tablespoons Hershey’s Cocoa
Flavor and Binding Ingredients:
- 4 teaspoons pure vanilla extract
- 1/2 cup corn syrup
- 1/4 cup sugar
Instructions
- Craft the indulgent chocolate foundation by blending sugar, flour, and cocoa in a spacious mixing vessel, ensuring a uniform texture.
- Incorporate heavy cream, whole milk, vanilla, and egg yolks, whisking methodically until the mixture achieves a silky, homogeneous consistency.
- Transfer the luscious mixture to a saucepan, positioning over medium-high heat and stirring continuously to prevent scorching, until the filling transforms into a thick, luxurious custard.
- Carefully distribute the velvety chocolate mixture between two pre-baked pie shells, creating an even layer that promises decadent depths.
- Prepare the cloud-like meringue topping by vigorously whipping egg whites, sugar, and corn syrup in an immaculately clean bowl until peaks stand dramatically and hold their shape.
- Generously cascade the glossy meringue across the chocolate landscape, meticulously sealing edges to create a seamless, protective covering.
- Position pies in a preheated 425°F oven, monitoring closely for 5-7 minutes until the meringue develops a golden, caramelized exterior.
- Extract pies and permit them to cool gracefully on a wire rack for a minimum of one hour, allowing flavors to harmonize and structure to set perfectly.
Notes
- Swap whole milk with alternatives like almond or oat milk for a dairy-free version that maintains creamy texture.
- Prevent meringue weeping by ensuring egg whites are at room temperature and sugar is fully dissolved during beating.
- Use cornstarch instead of flour for a gluten-free filling that sets smoothly and provides extra stability.
- Create silky-smooth filling by straining mixture through fine-mesh sieve to remove potential lumps before cooking.
- Prep Time: 20 minutes
- Cook Time: 7 minutes
- Category: Desserts
- Method: Baking
- Cuisine: American
Nutrition
- Serving Size: 8
- Calories: 450 kcal
- Sugar: 60 g
- Sodium: 40 mg
- Fat: 18 g
- Saturated Fat: 11 g
- Unsaturated Fat: 5 g
- Trans Fat: 0.3 g
- Carbohydrates: 65 g
- Fiber: 4 g
- Protein: 7 g
- Cholesterol: 210 mg
Samantha Lee
Recipe Developer & Content Creator
Expertise
Plant-based and vegetarian recipes, Recipe testing and development, Food blogging and digital content creation, Culinary education and workshops
Education
Oregon Culinary Institute (Portland, OR)
Samantha sees cooking like painting, every fresh herb, every juicy tomato, a new splash of color on a canvas.
After graduating from Oregon Culinary Institute, she blended her love of global cuisines and plant-based cooking into recipes that feel fresh, fearless, and full of heart.
Samantha’s kitchen is a place where comfort food gets a modern remix and every meal feels like a little adventure. When she’s not cooking, she’s out exploring farmers’ markets, sketching new recipe ideas, or getting her hands dirty in a community garden.